import { IKosDataModel } from "@coca-cola/kos-ui-core";
import type { KosConfigProperty } from "@coca-cola/kos-core-model";

export interface ConfigurationOptions {}

export interface ConfigurationModel
  extends ConfigurationOptions,
    IKosDataModel {
  id: string;
  cupName: KosConfigProperty<string>;
}Application Notes
Configuration Properties
Introduction
Configuration Bean and Properties, as described as part of building out the initial dispenser, provides a mechanism to you to declare system setting and configurations that can drive the behavior of the dispenser. These can be low level configurations that might control the flow rates on an individual pump or system level settings such as language and region preference that will have significant impact on the behavior of the user interface.
Configuration Properties represent a significant part of building out a Non-Consumer UI and provide a common mechanism to define and interact with system settings. In the backend they
This Application Note will take an initial look at how to integrate Configuration Properties defined in the backend application with the frontend UI.
The KOS UI SDK provides support for interacting with Configuration Beans and Properties as part of the model framework and enables a React idiomatic development style to make consuming and configuring this data easy.
There are a number of configuration properties already defined in the Lancer Start App that we can integrate with in the UI. Take a look at the com.kondra.kos.app.LancerAppConfig class in the lancer-start-kos project to understand what is involved creating new Configuration Properties in a Config Bean.
The values provided out of the box in the starter app include:
| Property | Type | Units | Default Value |
|---|---|---|---|
resolveDelayMs |
int |
milliseconds (ms) |
3000 |
maxPourVolumeMl |
int |
milliliters (ml) |
946 |
disablePumpTempC |
int |
celsius ( C ) |
38 |
cupName |
string |
N/A |
Large |
We will use these properties as the basis for this exercise as we look to wire up the Ingredient Assignment UI, created earlier as part of a previous Ingredient Assignment App Note, to allow a user to display and update these configurations.
Part 1 - Configuration Properties Model
Let’s start by creating a new model that will hold a collection of configuration properties.
Use the KOS CLI to create a new model as described in the Ingredient Assignment App Note to scaffold out a new model with the following details:
Question |
Answer |
Model Type Name |
Configuration |
Singleton |
Yes |
Include Data Services |
No |
Include Sample Component |
Yes |
This will create a new model that will be configured as a singleton allowing its data to be made available globally in the UI. We won’t need any additional data services as all of the interaction with the backend is provided by the decorators and classes provided by the KOS UI SDK.
Update The Model Interface
First off, add a new member to the ConfigurationModel interface that is of type KosConfigProperty that will reflect the cupType configuration property. Notice that the type is generic and we can specify that this property is of type string. This will provide more strongly typed access to the underlying property in the future.
We will add the other properties shortly, however for clarity we can start with the one.
src/models/configuration/types/index.d.ts
Update The Model
Adding the configuration property to our new model is as easy as declaring a new class member and annotating it with the kosConfigProperty decorator.
The minimal configuration required for the decorator is to specify the handle path, indicating the configuration bean, and the attribute name.
In this example, the configuration is found on the main System App Config bean found at system.app with an attribute name of cupName.
src/models/configuration/configuration-model.ts
import { kosModel, KosLog, Kos } from "@coca-cola/kos-ui-core";
import { ConfigurationModel, ConfigurationOptions } from "./types";
import { KosConfigProperty, kosConfigProperty } from "@coca-cola/kos-core-model";
import {convert} from "@coca-cola/kos-unit-conversion";

const MODEL_TYPE = "configuration-model";

const log = KosLog.getLogger("configuration-model");

@kosModel<ConfigurationModel, ConfigurationOptions>(MODEL_TYPE)
class ConfigurationModelImpl implements ConfigurationModel {
  id: string;

  @kosConfigProperty({ path: "system.app", attribute: "cupName" })
  cupName: KosConfigProperty<string>;

  constructor(modelId: string, options: ConfigurationOptions) {
    this.id = modelId;
  }
}

const Registration = {
  registration: {
    [MODEL_TYPE]: {
      class: ConfigurationModelImpl,
      singleton: true,
    },
  },
  type: MODEL_TYPE,
  factory: Kos.Factory.create<ConfigurationModel, ConfigurationOptions>(
    MODEL_TYPE
  ),
};
export default Registration;
That’s all that’s needed to bring a configuration property into a model. The decorator will ensure that the corresponding config bean is loaded as part of the model lifecycle and will make the specific attribute available by injecting it into the cupName class property.
Register the model
We can register the new model with the application using it’s provided registration bean.
There are a number of models provided by the KOS UI SDK to help streamline common interactions and patterns. Amongst them is the Configuration Bean and Configuration Property models that are the focus of this exercise. The SDK provides a common registration bean to ensure all of the core models are available to your application.
src/registration.ts
import { CoreModels} from "@coca-cola/kos-core-model";
import {Configuration} from "./models/configuration";
export const Registry: IKosRegistry = {
  models: {
    ...CoreModels, (1)
    ...Dispenser.registration,
    ...IngredientContainer.registration,
    ...Ingredient.registration,
    ...Holder.registration,
    ...Configuration.registration (2)
  },
  preloadModels: [Dispenser.type],
};| 1 | Register the core models provided by the SDK including configuration beans and properties. |
| 2 | Register the newly created Configuration Model |
UI Components
For the purposes of this exercise, we will replace the main content of the previous ingredient assignment UI with a new component that will display the configuration properties.
Not much is changing here, just replacing the old HolderContainer with a new ConfigurationView that was created with the model.
src/components/dispenser/dispenser.tsx
import { kosComponent, LoadingMessage } from "@coca-cola/kos-ui-components";
import React, { PropsWithChildren } from "react";
import { useDispenserModel } from "../../hooks/dispenser";
import { ConfigurationView } from "../configuration";

interface Props {}

export const DispenserView: React.FunctionComponent<PropsWithChildren<Props>> =
  kosComponent(function DispenserView() {
    const { status, KosModelLoader } = useDispenserModel();

    return (
      <KosModelLoader {...status} loading={<LoadingMessage></LoadingMessage>}>
        {/* <HolderContainer></HolderContainer> */}
        <ConfigurationView></ConfigurationView>
      </KosModelLoader>
    );
  });
The ConfigurationView component can be updated to include a new component that will manage all of the UI interactions with the properties.
| While it’s not necessary to create the additional layer of components every time, this example is doing so to demonstrate how the model context can be used in any child components. |
src/components/configuration/configuration.tsx
import { ConfigurationProperties } from "./config-properties";

interface Props {}

export const ConfigurationView: React.FunctionComponent<
  PropsWithChildren<Props>
> = kosComponent(function ConfigurationView() {
  const { status, KosModelLoader } = useConfigurationModel(); (1)

  return (
    <KosModelLoader {...status} loading={<LoadingMessage></LoadingMessage>}>
      <ConfigurationProperties></ConfigurationProperties>  (2)
    </KosModelLoader>
  );
});| 1 | Bring in the model using the associated React hook |
| 2 | Place the content for the configuration properties as children to the KosModelLoader to ensure that the contents will only be rendered once the model is loaded and ready. |
Lastly, the ConfigurationProperties can display the contents of the config properties.
The InputText component is a basic React input text that has no knowledge or understanding of KOS models or config properties. It was created for the purposes of showing that the data and interactions provided by the Configuration Properties model is agnostic of any specific UI component library.
|
src/components/configuration/config-properties.tsx
import { kosComponent, useContextModel } from "@coca-cola/kos-ui-components";
import React, { PropsWithChildren } from "react";
import { ConfigurationModel } from "../../models/configuration";
import { InputSelect } from "../input-select/input-select";
import { InputText } from "../input-text/input-text";

interface Props {}

export const ConfigurationProperties: React.FunctionComponent<
  PropsWithChildren<Props>
> = kosComponent(function ConfigurationProperties() {
  const model = useContextModel<ConfigurationModel>(); (1)

  return (
    <>
      <div
        style={{
          border: "solid 1px black",
          padding: 10,
          margin: 15,
          width: 400,
        }}
      >
        <InputText
          label="Cup Name:"
          onChange={(val) => {
            model?.cupName.updateProperty(val); (2)
          }}
        ></InputText>
        <span>Display Value: {model?.cupName.displayValue}</span> (3)
      </div>
    </>
  );
});| 1 | Access the model from the KosModelLoader context which will return the model fetched by the React hook. When used in this way, there are assurances that the model has already been retrieved and is ready for use by the UI. |
| 2 | The onChange listener will call into the updateProperty function provided by the configuration property model. |
| 3 | The display value of the property (discussed shortly) will present the formatted representation of the value managed by this property. |
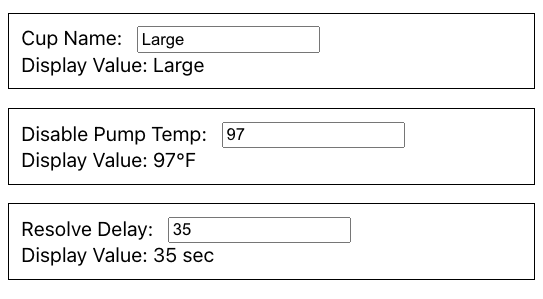
When you start the UI project you should be presented with the following:

When you type in the text box and tab (or focus) out the Display Value will update.
Explanation
-
When the user enters a value into the text box, the
onChangelistener is invoked calling into theupdatePropertyfunction provided by theKosConfigPropertyclass. -
The
KosConfigPropertywill detect the value change and send a WebSocket message to the backend requesting that thesystem.appconfiguration bean be updated with the new value forcupName. -
The value is updated in the backend and a WebSocket message is sent with the list of changes made to the bean.
-
The
KosConfigProperty, having already subscribed to the websocket is able to wait for the response and update the config bean values. -
These changes are reflected in the model and any UI components that are using the
kosComponentHOC that are consuming either thevalueordisplayValueproperties will be automatically rerendered.
This means that not only are changes made directly by the user updated in the UI, but also any processes in the backend that may make changes to the underlying configuration bean will automatically result in the value in the UI being updated to reflect the change.
The can be tested, even in this limited UI, by sending a POST message using Postman or curl to http://localhost:8081/api/kos/config/system.app with the payload
{
    "cupName": "Very Large"

}
and watching the Display value automatically update in near realtime.
Unit Conversion
Configuration properties on their own are incredibly powerful as they solve entire classes of problems including data persistence, configuration and propagation of changes out of the box. For that reason they are an important part of any KOS application and should be used whenever possible. However, when considering internationalization, there are some additional capabilities that are provided out of the box that can make the UI developer’s life easier. One of the more prominent being unit conversion.
When you consider the type of data that is typically stored in configuration beans, it is often numeric and generally has a unit of measure associated with it. Things like setting temperature warnings or volume limits are common examples that are stored in configuration beans and exposed to the UI.
In most cases, configuration data that is commonly configured as part of an administrative UI, is stored in the backend in International System (SI) units. In countries where non-SI units are used, like the United States, we need to ensure that the values displayed on the screen are in region specific units . This is where the KOS UI SDK comes in to help.
The KOS UI SDK provides unit conversion as a first class concept for numeric KOS Configuration Properties that allows for seamless bi-direction conversion in the model layer in order to avoid error-prone and inconsistent implementations throughout the UI code.
To demonstrate this, we can add a number of numeric properties to our Configuration model that can make use of the built-in unit conversion capabilities.
Model Interface
Add the remaining properties to the model interface to reflect these properties.
src/models/configuration/types/index.d.ts
import { IKosDataModel } from "@coca-cola/kos-ui-core";
import type { KosConfigProperty } from "@coca-cola/kos-core-model";

export interface ConfigurationOptions {}

export interface ConfigurationModel
  extends ConfigurationOptions,
    IKosDataModel {
  id: string;
  resolveDelayMs: KosConfigProperty<number>;
  maxPourVolumeMl: KosConfigProperty<number>;
  disablePumpTempC: KosConfigProperty<number>;
  cupName: KosConfigProperty<string>;

}
Update the model class to add the following configuration properties:
src/models/configuration/configuration-model.ts
  @kosConfigProperty({ path: "system.app",
  attribute: "resolveDelayMs",
  converter: {
    measure: "time",
    to: "seconds"
  }})
  resolveDelayMs: KosConfigProperty<number>;

  @kosConfigProperty({ path: "system.app",
  attribute: "maxPourVolumeMl",
  converter: {
    measure: "volume"
  })
  maxPourVolumeMl: KosConfigProperty<number>;

  @kosConfigProperty({ path: "system.app",
  attribute: "disablePumpTempC" ,
  converter: {
    measure: "temperature",
  }})
  disablePumpTempC: KosConfigProperty<number>;

  @kosConfigProperty({ path: "system.app", attribute: "cupName" })
  cupName: KosConfigProperty<string>;
There are a couple of important concepts demonstrated here that allow you to customize the presentation of numerical data without requiring any additional UI code. All of the logic is managed in the model layer:
Converter
The kosConfigProperty decorator accepts an optional converter object that allows the model developer to specify how unit conversion should be performed. In most cases it is sufficient to specify the measure property and the framework will automatically convert to the appropriate unit based on the currently selected region for the dispenser.
For example, if the measure property is set to volume, the framework will assume that the value in the configuration bean is stored in SI units. If not declared in the decorator, the framework will assume that the default unit for the specified measure will be used as the conversion source. Out of the box, the default volume unit is configured as milliliters for the si unit system. If the selected region for the dispenser is one that uses the us unit system the framework will assume that the conversion target will beto fluid-ounce. If a different unit is desired in the UI where the default is not appropriate, it can be specified in the to property. For example, if the to property is set to cups, and cups has been configured on the backend as a valid unit for the volume measure, the framework will convert the value from milliliters to cups.
From a user perspective, the UI will display the value in the appropriate units for the region and the backend will store the value in the appropriate units for the dispenser. With conversion occuring in a bi-directional manner. The developer does not need to worry about the conversion logic or the unit system that is being used.
| The unit systems and the regions are configured in the backend through the UnitSystem and Unit configurations. |
Formatter
In the same way that conversion can be specified in the model layer, the kosConfigProperty decorator also accepts an optional formatter property that allows the developer to have fine-grained, locale specific, control over the number formatting rules applied to the configuration property. This property, like the converter, accepts either an object literal that conforms to the Intl.NumberFormatOption interface or a function that returns the Intl.NumberFormatOption object based on the passed in System.
In many cases the default formatting rules can be automatically applied based on the measure and the unit system. For example, the number of decimal places to be displayed for a given unit is configured in the backend unit system configuration. The UI can use the displayValue property on the config bean to display a formatted valued based on the data defined in metadata. However, in some cases, the developer may want to have more control over the formatting rules. For example, if the value is a percentage, the developer may want to specify that the value should be displayed as a percentage. Or if the value is a currency, the developer may want to specify the currency symbol and the number of fractional digits to display. In these cases, the developer can specify the formatter property in the decorator.
The formatter can specify the units that the value should be displayed in, the number of significant digits and the number of fractional digits to display. It can also specify a number of locale and unit specific configuration too numerous to describe here.
UI Components
With the changes made to the model, updating the UI is the same for all of the properties regardless of whether there is any complex formatting or conversion required.
src/components/configuration/config-properties.tsx
<div
        style={{
          border: "solid 1px black",
          padding: 10,
          margin: 15,
          width: 400,
        }}
      >
        <InputText
          label="Disable Pump Temp:"
          value={model?.disablePumpTempC.value}
          onChange={(val) => {
            model?.disablePumpTempC.updateProperty(val);
          }}
        ></InputText>
        <span>Display Value: {model?.disablePumpTempC.displayValue}</span>
      </div>
      <div
        style={{
          border: "solid 1px black",
          padding: 10,
          margin: 15,
          width: 400,
        }}
      >
        <InputText
          label="Resolve Delay:"
          value={model?.resolveDelayMs.value}
          onChange={(val) => {
            model?.resolveDelayMs.updateProperty(val);
          }}
        ></InputText>
        <span>Display Value: {model?.resolveDelayMs.displayValue}</span>
      </div>
In each case, the UI only needs to concern itself with selecting or creating an appropriate component for the data type (Input, Select, Checkbox etc) and use the raw value or formatted displayValue from the configuration property to display and update data correctly.
| Conversion is happing in a bi-directional manner with the values being entered by the user in the target unit and converted prior to being sent to the backend. |
Enums
There are some configuration properties that are backed by an enumeration or list of values. The KOS UI SDK has support for these types with options being made available for consumption by the UI.
To demonstrate this, add a new enum property to the AppConfig class and restart the Lancer starter app:
Lancer App Config in kos-lancer-starter app
package com.kondra.kos.app;

import com.tccc.kos.core.service.app.AppConfig;

import lombok.Getter;
import lombok.Setter;

enum SystemType {
	SI,Imperial
}
@Getter @Setter
public class LancerAppConfig extends AppConfig {
    private int resolveDelayMs;            // how long troubles take to resovle in ms
    private String installTime;            // what time of day should we install updates
    private int maxPourVolumeMl;           // max volume of a pour in ml
    private int disablePumpTempC;          // temperature threshold to disable the pump in C
    private String cupName; 				// display name of the cup

    private SystemType measurementSystem;
    private boolean enablePortionControl;  // flag to enable a feature

    {
        resolveDelayMs = 3000;
        maxPourVolumeMl = 946;
        disablePumpTempC = 38;
        cupName = "Large";
        measurementSystem = SystemType.SI;
    }
}
This adds a measurementSystem enum with values of "SI" and "Imperial" that will be available for configuration once the app is restarted.
Add the new measurementSystem to the KOS model and interface to make it available:
src/models/configuration/configuration-model.ts
  @kosConfigProperty({ path: "system.app", attribute: "measurementSystem" })
  measurementSystem: KosConfigProperty<string>;
Notice that this configuration is the same as the others with only minimal decoration required.
UI Components
The KosConfigProperty class exposes an options attribute that will return the list of enumerated options that are configured as an array of labels and values:
[
    {
        "value": "SI",
        "label": "SI"
    },
    {
        "value": "Imperial",
        "label": "Imperial"
    }
]
These can be applied by mapping the options into your UI component of choice. For example, here is a case where the options are merely passed into a select component as a prop. The rest of the interaction remains the same with the display value and value attributes working similarly to other property types.
src/components/configuration/config-properties.tsx
<div
style={{
border: "solid 1px black",
padding: 10,
margin: 15,
width: 400,
}}
>
<InputSelect
label="Measurement System:"
defaultValue={model?.measurementSystem.displayValue}
options={model?.measurementSystem.options}
onChange={(val) => {
model?.measurementSystem.updateProperty(val);
}}
></InputSelect>
<span>Display Value: {model?.measurementSystem.displayValue}</span>
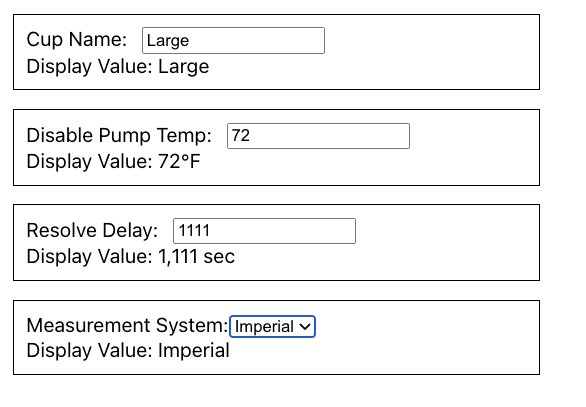
</div>The end result is a UI component with the options available for selection:
Computed Values
The KosConfigProperty attributes (value and display value) are observable like any model property. This means that not only UI consumers but other models can observe the properties for changes and respond accordingly.
One of the most common way to handle these reaction is through the use of computed values.
For example, if you create a new attribute in the Configuration Model (interface and model) called computedValue as a number:
src/models/configuration/types/index.d.ts
export interface ConfigurationModel
  extends ConfigurationOptions,
    IKosDataModel {
 ...
  computedValue: number;
}
If you add a getter to the model for the computed value then you can use configuration property values as part of a computed value or calculation:
src/models/configuration/configuration-model.ts
  get computedValue() {
    return this.resolveDelayMs.value + this.disablePumpTempC.value;
  }
Because of the reactive nature of the models and their properties, this convention will mean that any changes to the resolveDelayMs or disablePumpTempC values will result in the computedValue property recalculating with any interested observers subsequently being updated with the sum total of the two values combined.
This is one of the most powerful aspects of the model framework and one of the primary ways that configuration properties can be used to not only enable data update but also triggering reactive behavior in the UI and model layers.
The reactive behavior can be observed by putting the following into the ConfigurationProperties component.
src/components/configuration/config-properties.tsx
      <div>
        <h1>{model?.computedValue}</h1>
      </div>
Resulting in:
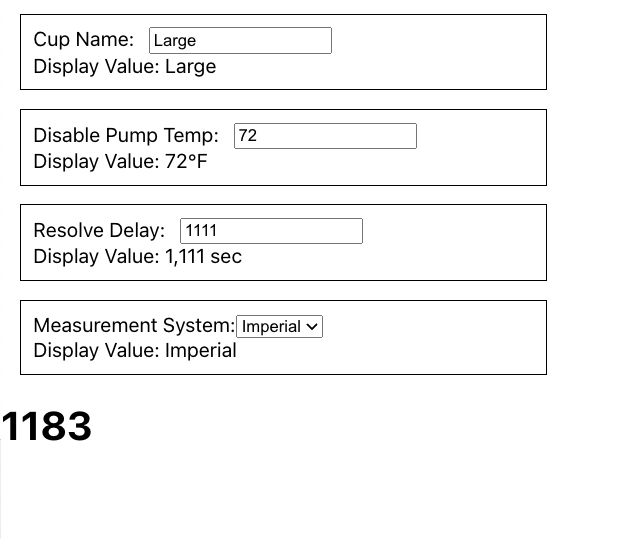
Any changes made to the resolve delay or temperature will either in the UI or via backend processes, will result in the computed value at the bottom being recalculated and rerendered.
Summary
At the completion of this initial review of Configuration Properties in the KOS SDK we have covered quite a lot of ground including:
-
Declaring interest in a configuration property
-
Connecting simple configuration properties to the UI.
-
Unit Conversion
-
Number formatting
-
Computed/Derived values
In subsequent notes we will take a closer look at some of the advance concepts including how to customize the list of available options and handling large quantities of configuration properties at the config bean level.
On this page
Java Development
Seamlessly transition from Legacy+ systems to Freestyle microdosing and advanced distributed dispense systems.
UI Development
Using KOS SDKs, integrating Consumer and Non-consumer facing UIs becomes seamless, giving you less hassle and more time to create.
Video Library
Meet some of our development team, as they lead you through the tools, features, and tips and tricks of various KOS tools.
Resources
Familiarize yourself with KOS terminology, our reference materials, and explore additional resources that complement your KOS journey.
Copyright © 2024 TCCC. All rights reserved.