
Application Notes
Ingredient Assignment
Introduction
One of the critical capabilities for KOS is to enable an integrated frontend and backend stack that promotes reuse and can scale efficiently across platforms.
In this app note we will look at how to build out a user interface that can interact with a KOS developed application using the UI SDK and provided toolchain.
Scenario
In this exercise we will use the KOS SDK to build out a common dispenser scenario where we want to assign ingredients to a holder or collection of pumps.
There are a number of interactions and models that need to available to make this possible including
-
Backend:
-
Ingredient Services and Controller
-
Holder Services and Controller
-
Assignment Services and Controller
-
-
Frontend:
-
Dispenser Model
-
Ingredient Model and Ingredient Container Model and Services
-
Holder Model and Services
-
UI Components
-
The expected interaction between the models and backend services will follow this general patternL
The Backend services will dovetail off of the work completed in the Basic Legacy Dispenser Application Notes to provide API endpoint and services to support holders, ingredients and assignments.
Upon completion we should have enough infrastructure to support interactions between the UI and backend services provided through a baseline and delta model that can equally support both direct UI interactions based on user input and indirect external (non-UI originated) events without requiring multiple or distributed code paths.
Part 1: UI Project Setup
We will use the KOS UI Create React App template to quickly set up your frontend project so it’s ready to start development.
| It is assumed that you have already set up your NPM/Yarn to be able to reach the @coca-cola scoped registry. |
Create a new project using the KOS create react app template
npx create-react-app ingredient-assignment --template @coca-cola/kos-ui@canaryCreating a new React app in /Users/markpomerant/Code/sample-sdk/ingredient-assignment. Installing packages. This might take a couple of minutes. Installing react, react-dom, and react-scripts with @coca-cola/cra-template-kos-ui...
This will add all of the KOS packages and utilities to the project and scaffold it out with everything wired up and ready to start.
At this point, change into the newly created ingredient-assignment directory and start up the project.
npm startCompiled successfully! You can now view ingredient-assignment in the browser. Local: http://localhost:3000 On Your Network: http://10.0.0.106:3000 Note that the development build is not optimized. To create a production build, use npm run build. webpack compiled successfully No issues found.
You should be able to access the starter project in the project
Part 2: Create An Ingredient Model
We will start with creating the KOS entities needed to model the list of ingredients that are currently available to be assigned. These ingredients will be source from the backend /api/ingredients endpoint that is provided in the Java layer by the IngredientController.
A model can be created using the cli that is bundled into the scaffolded project. Run the kos:model script from the root of the project.
npm run kos:model Ingredient> ingredient-assignment@0.1.0 kos:model > kosui create-kos-model "Ingredient" _ ___ ____ ____ _ ___ | | __/ _ \/ ___| / ___| | |_ _| | |/ / | | \___ \ | | | | | | | <| |_| |___) | | |___| |___ | | |_|\_\\___/|____/ \____|_____|___| ? Is the model a singleton? No ? Include data services? Yes ? Include a sample component? No ✔ +! 1 files added -> /src/models/ingredient/types/index.d.ts ✔ +! 2 files added -> /src/models/ingredient/index.ts -> /src/models/ingredient/ingredient-model.ts ✔ +! 2 files added -> /src/models/ingredient/services/index.ts -> /src/models/ingredient/services/ingredient-services.ts
Add model properties to Ingredient interface
Add the ingredient name property to the IIngredientOptions interface.
The name will be passed into the model via the constructor so the options interface will be used.
src/models/ingredient/types/index.d.ts
import { IKosDataModel } from "@coca-cola/kos-ui-core";

export interface IIngredientOptions {
  name: string;  (1)
}

export interface IIngredientModel extends IIngredientOptions, IKosDataModel {
  id: string;
}| 1 | Add a name property to the options |
Update the Ingredient model implementation
src/models/ingredient/ingredient-model.ts
import { kosModel, KosLog, Kos } from "@coca-cola/kos-ui-core";
import { IIngredientModel, IIngredientOptions } from "./types";

const MODEL_TYPE = "ingredient-model";

const log = KosLog.getLogger("ingredient-model");

@kosModel<IIngredientModel, IIngredientOptions>(MODEL_TYPE)
export class IngredientModel implements IIngredientModel {
  id: string;
  name: string;

  constructor(modelId: string, options: IIngredientOptions) {
    this.id = modelId;
    this.name = options.name; (1)
  }

}

const Registration = { (2)
  registration: {
    [MODEL_TYPE]: {
      class: IngredientModel,
      singleton: false,
    },
  },
  type: MODEL_TYPE,
  factory: Kos.Factory.create<IIngredientModel, IIngredientOptions>(MODEL_TYPE),
};
export default Registration;| 1 | assign the name from the incoming options |
| 2 | model registration data emitted by the KOS CLI |
Ingredient Services
The KOS UI CLI, based on the questions asked at creation time, created an initial service module at models/ingredient/services/ingredient-services.ts that will provide access to the underlying data services made available from the backend.
The generated stub will need to be update to reflect the API path provided and implement any services that are required (getAll, getOne, putModel, postModel, deleteModel) depending on requirements. In this case we only need to provide access to a backend call to retrieve the list of ingredients from the path /api/ingredients as defined in the Ingredient Controller on the backend.
src/models/ingredient/services/ingredient-services.ts
import { ServiceFactory, resolveServiceUrl } from "@coca-cola/kos-ui-core";
const { URL } = resolveServiceUrl("INGREDIENT_SERVICE");
const { getAll } = ServiceFactory.build({ (1)
  basePath: `${URL}/api/ingredients`, (2)
});

interface IngredientResponse { (3)
  id: string;
  name: string;
}
/**
 * @category Service
 * Retrieves the initial Ingredient data.
 */
export const getIngredients = async () => {  (4)
  const response = await getAll<IngredientResponse>({});
  return response;
};| 1 | use the ServiceFactory to provide a set of service specific handlers for interacting with backend data. Options include getOne, getAll, deleteModel, postModel, putModel, modifyModel. |
| 2 | set the path where service operation will be performed |
| 3 | provide the typing for the incoming data payloads. This is useful when mapping from backend to frontend data structures. |
| 4 | provide service functions for each of the operation to be performed on the backend |
We updated the ServiceFactory basePath and added to the scaffolded IngredientResponse to reflect the additional properties that are being sent from the backend API.
| As a general rule, it’s a good idea to have the service module define the responses coming from the backend separately from the model interfaces as we are not going to necessarily have a 1:1 reflection of backend to model data. Having separate interface will allow for data mapping to occur to accommodate differences in the model such as conversion from ISO dates to Javascript or any other data processing that might be needed. |
Create an ingredient container
We are going to create a lightweight model that will serve as the container for the list of ingredients. This is generally a design choice that you will make depending on the lifecycle of the models involved. If the desire is to the have the loading and lifecycle of the model be independent or if there are operations that you can perform against the collection of models then it will make sense to create a model to encapsulate the collection lifecycle.
In many cases this isn’t needed and the management of the collection can be part of a parent model. For example, in the ingredient assignment example, it would be acceptable to have the fetching of the ingredient data and the management of the ingredient models be part of the DispenserModel lifecycle with access to the collection of models being provided by the dispenser itself.
Ultimately, how your models are organized and where to draw the boundaries will come down the amount of autonomy and reuse you want to provide.
We can use the KOS CLI to generate the ingredient container model that will encapsulate our list of ingredients. In this case we will model the ingredient container as a singleton as we don’t have a need to maintain multiple list of ingredients at this time. This can be changed in the future as requirements emerge.
npm run kos:model "Ingredient Container"> ingredient-assignment@0.1.0 kos:model > kosui create-kos-model "Ingredient Container" _ ___ ____ ____ _ ___ | | __/ _ \/ ___| / ___| | |_ _| | |/ / | | \___ \ | | | | | | | <| |_| |___) | | |___| |___ | | |_|\_\\___/|____/ \____|_____|___| ? Is the model a singleton? Yes ? Include data services? No ? Include a sample component? Yes ✔ +! 1 files added -> /src/models/ingredient-container/types/index.d.ts ✔ +! 2 files added -> /src/models/ingredient-container/index.ts -> /src/models/ingredient-container/ingredient-container-model.ts ✔ +! 0 files added -> ✔ +! 2 files added -> /src/components/ingredient-container/index.ts -> /src/components/ingredient-container/ingredient-container.tsx ✔ +! 2 files added -> /src/hooks/ingredient-container/index.ts -> /src/hooks/ingredient-container/use-ingredient-container.tsx
Update the Ingredient Container interface
The Ingredient Container is a lightweight model that will only need to maintain the collection of ingredients from the backend. The changes to the scaffolded interface is relatively small with only a new member container that will implement the IKosModelContainer with the generic indicating that a collection of IIngredientModel models will be managed:
src/models/ingredient-container/types/index.d.ts
import { IKosDataModel, IKosModelContainer } from "@coca-cola/kos-ui-core";
import {IIngredientModel} from "../../ingredient";

export interface IIngredientContainerOptions {}

export interface IIngredientContainerModel
  extends IIngredientContainerOptions,
    IKosDataModel {
  id: string;
  container: IKosModelContainer<IIngredientModel>; (1)

}| 1 | use IKosModelContainer data structure when managing a collection of models |
Update the Ingredient Container implementation
At this point, we are going to wire up the backend to the model layer by utilizing the KOS Model lifecycle callbacks.
For the ingredient container, we will use the load() lifecycle hook to wait to retrieve the ingredient data via the Ingredient Service described earlier. We can await the getIngredients service and and use the response to iterate over the list of ingredients and create new IngredientModel instances that can be added to the managed collection.
The new models are created using a model factory that is part of the default export from the Ingredient module.
| By using the provided factory, you ensure that models are created consistently and will properly hook into the overall application lifecycle. |
src/models/ingredient-container/ingredient-container-model.ts
import { IKosModelContainer, KosModelContainer,kosModel, KosLog, Kos } from "@coca-cola/kos-ui-core";
import {IIngredientModel, Ingredient, Services} from "../ingredient";
import {
  IIngredientContainerModel,
  IIngredientContainerOptions,
} from "./types";

const MODEL_TYPE = "ingredient-container-model";

const log = KosLog.getLogger("ingredient container-model");

@kosModel<IIngredientContainerModel, IIngredientContainerOptions>(MODEL_TYPE)
export class IngredientContainerModel implements IIngredientContainerModel {
  id: string;
  container: IKosModelContainer<IIngredientModel>

  constructor(modelId: string, options: IIngredientContainerOptions) {
    this.id = modelId;
    this.container = new KosModelContainer(); (1)
  }

  // -------------------LIFECYCLE----------------------------


  async load(): Promise<void> { (2)
    log.debug("loading ingredient container");
    const ingredients = await Services.getIngredients(); (3)
     ingredients?.data.forEach((ingredientData) => {
        const ingredient = Ingredient.factory(ingredientData.id)(ingredientData); (4)
        this.container.addModel(ingredient); (5)
     })
  }

  getChildren() {
    return [...this.container.data]
  }
}

const Registration = {
  registration: {
    [MODEL_TYPE]: {
      class: IngredientContainerModel,
      singleton: true,
    },
  },
  type: MODEL_TYPE,
  factory: Kos.Factory.create<
    IIngredientContainerModel,
    IIngredientContainerOptions
  >(MODEL_TYPE),
};
export default Registration;| 1 | provide implementation of IKosModelContainer using KosModelContainer class |
| 2 | implement the load lifecycle hook to load and populate backend data when the model is first loaded |
| 3 | use the services provided earlier to invoke the service functions |
| 4 | map the data into IngredientModels. Uses the Ingredient Factory that is provided in the model registration generated by the CLI |
| 5 | add the created models to the collection |
When creating relationships between models, if there is a strict containment (parent/child) relationship where the removal of the parent should cascade down to the children, you will need to declare this relationship via the getChildren method defined in the IKosDataModel. By doing this, the framework will be able to automatically cascade deletion as well ensuring that listeners are automatically cleaned up across the entity graph.
|
Wiring Up The Ingredients
In order to hook the new container in the Dispenser lifecycle we can add a dependency in the scaffolded DispenserModel
Update Dispenser interface
The kos UI create-react-app template scaffolded out the project with a default DispenserModel. We need to update the IDispenserModel interface to include the newly created IngredientContainerModel
src/models/dispenser/types/index.d.ts
import { IKosDataModel } from "@coca-cola/kos-ui-core";
import {IIngredientContainerModel} from "../../ingredient-container";

export interface IDispenserOptions {}

export interface IDispenserModel extends IDispenserOptions, IKosDataModel {
  id: string;
  ingredients: IIngredientContainerModel;

}
Add dependency to the Dispenser
We can update the scaffolded DispenserModel by adding the dependency to the IngredientContainerModel. All that’s needed is to decorate the member with the @kosDependency annotation.
Through the use of this decorator, the framework will automatically instantiate a new instance of the model based on it’s type. Since the model was declared as a singleton, all that is needed is to provided the modelType. Otherwise, the modelId will also needed to be provided in the decorator in order to properly retrieve the correct instance.
src/models/dispenser/dispenser-model.ts
import { kosModel, KosLog, Kos, kosDependency } from "@coca-cola/kos-ui-core";
import { IDispenserModel, IDispenserOptions } from "./types";
import {IIngredientContainerModel, IngredientContainer} from "../ingredient-container";

const MODEL_TYPE = "dispenser-model";

const log = KosLog.getLogger("dispenser-model");

@kosModel<IDispenserModel, IDispenserOptions>(MODEL_TYPE)
export class DispenserModel implements IDispenserModel {
  id: string;

  // add dependency to the Ingredient Container which
  // will ensure the model is loaded as part of the application
  @kosDependency({modelType: IngredientContainer.type}) (1)
  ingredients!: IIngredientContainerModel; (2)

  constructor(modelId: string) {
    log.debug("creating new instance of Dispenser Model");
    this.id = modelId;
  }

  getChildren() { (3)
    return [this.ingredients]
  }
}

const Registration = {
  registration: {
    [MODEL_TYPE]: {
      class: DispenserModel,
      singleton: true,
    },
  },
  type: MODEL_TYPE,
  factory: Kos.Factory.create<IDispenserModel, IDispenserOptions>(MODEL_TYPE),
};
export default Registration;| 1 | add a dependency using the kosDependency decorator. For singletons, only the modelType is needed |
| 2 | the ingredients property will be injected by the framework once the model is available |
| 3 | declare a parent/child relationship |
Model Registration
In order to have your application make use of these new models you need to register them with the Kos Context provider.
To do this you need to add the model definitions to the registration.ts that has been scaffolded into the root of the project source tree.
By using the KOS CLI, the scaffolded models export a registration object that can be used to easily specify the types of models used in the application.
src/registration.ts
import type { IKosRegistry } from "@coca-cola/kos-ui-core";
import { Dispenser } from "./models/dispenser"; (1)
import {Ingredient} from "./models/ingredient";
import {IngredientContainer} from "./models/ingredient-container";
export const Registry: IKosRegistry = {
  models: {
    ...Dispenser.registration, (2)
    ...IngredientContainer.registration,
    ...Ingredient.registration
  },
  preloadModels: [Dispenser.type],
};| 1 | cli-generated models export a registration declaration object that can map into the application registration process |
| 2 | uses the registration object from the model declaration directly |
Validating integration
Assuming the backend is running and has been created with the ingredients endpoint, if you start up the frontend you should be able to validate that the models have been wired up:
npm startCompiled successfully! You can now view ingredient-assignment in the browser. Local: http://localhost:3000 On Your Network: http://10.0.0.106:3000 Note that the development build is not optimized. To create a production build, use npm run build. webpack compiled successfully No issues found.
If you open a browser and open the Dev Tools to the console you should see the network request going across the websocket and returning the result:
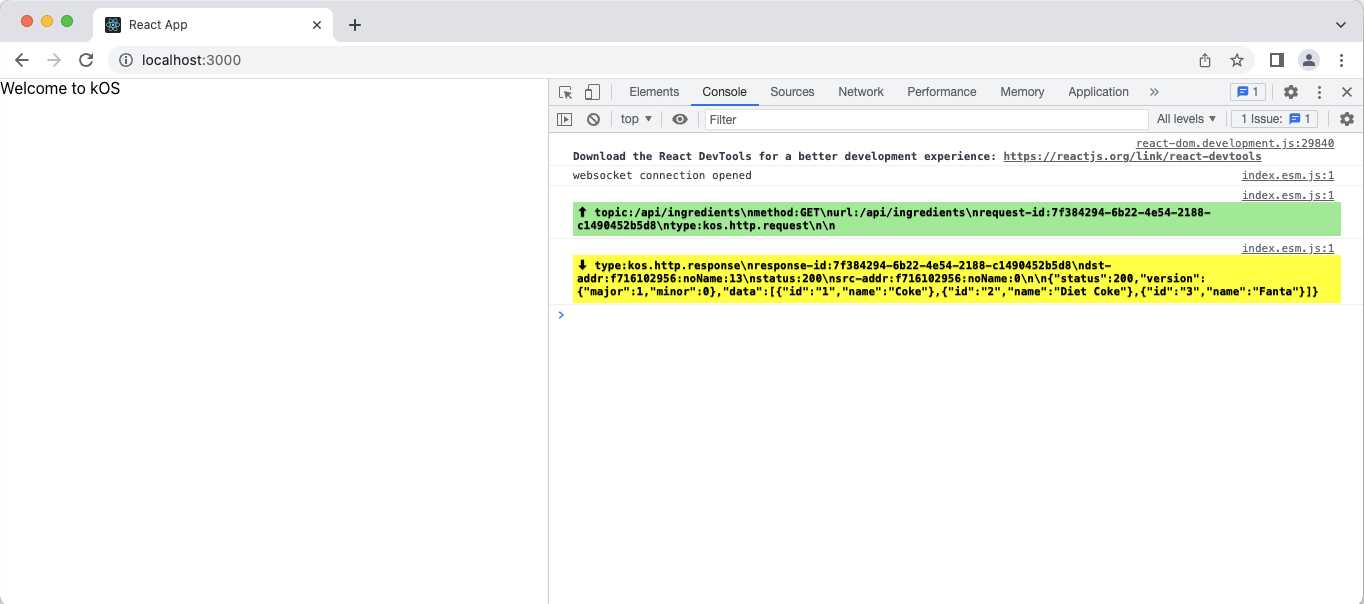
Additionally, if you change the logging level for the UI to "DEBUG" by updating the setting in the App.tsx file you will see log messages indicating the new models are being created:
KosLog.setLevel("DEBUG");
Model ingredient-model with id 1 initialized
index.esm.js:1 Model ingredient-model with id 2 initialized
index.esm.js:1 Model ingredient-model with id 3 initialized
index.esm.js:1 Model ingredient-container-model with id ingredient-container-model loaded
index.esm.js:1 loading model ingredient-model with id 1
index.esm.js:1 loading model ingredient-model with id 2
index.esm.js:1 loading model ingredient-model with id 3
index.esm.js:1 readying model ingredient-container-model with id ingredient-container-model
index.esm.js:1 Model ingredient-model with id 1 loaded
index.esm.js:1 Model ingredient-model with id 2 loaded
index.esm.js:1 Model ingredient-model with id 3 loaded
index.esm.js:1 readying model ingredient-model with id 1
index.esm.js:1 readying model ingredient-model with id 2
index.esm.js:1 readying model ingredient-model with id 3
Part 3: Connecting the UI
We have enough in place to start presenting model data in the UI. We’ll start with a simple component that allows listing and selection of the retrieved ingredients.
When we scaffolded out the ingredient container, we asked for a sample UI component to be produced at the same time. We can update this basic container to render an Ingredient Select component.
First we can update the IngredientContainerView to include a new component which we’ll create next.
In this component we are using a hook useIngredientContainerModel that was also created by the cli. This hook will request an instance of the model and will return:
-
a
KosModelLoadercomponent that can be used as a guard while the model is being retrieved and potentially going through it’s lifecycle to a point where it is prepared to be displayed to the user. This component will-
allow provide error boundaries that will safeguard against catastrophic global failures in the event there are issues during the load.
-
allow you to pass in a Loading component that will be displayed until the model has finished loading. This will reduce the amount of guard conditions needed in UI code as the children wont render until the model is available.
-
-
a
statusobject that include the model itself, a ready flag to indicate that the model has passed through theready()lifecycle phase, and an error that will return any error conditions that may have resulted from loading. This object will normally be passed in to the providedKosModelLoaderusing the spread operator. However, in cases where you need to do additional processing on the model you can use them directly rather than using the provided component. -
All of the
error,ready, andmodelparameters are also returned as top level objects from the hook as a convenience for situations where custom or complex manipulation is required.
src/components/ingredient-container/ingredient-container.tsx
import { kosComponent, LoadingMessage } from "@coca-cola/kos-ui-components";
import React, { PropsWithChildren, useCallback } from "react";
import { useIngredientContainerModel } from "../../hooks/ingredient-container";
import { IngredientSelect } from "./ingredient-select";

interface Props {}

export const IngredientContainerView: React.FunctionComponent<
  PropsWithChildren<Props>
> = kosComponent(function IngredientContainerView() { (1)
  const { status, KosModelLoader } = useIngredientContainerModel(); (2)
  const ingredientSelected = useCallback((id: string) => {
    alert(`selected ingredient with ID: ${id}`);
  }, []);
  return (
    <KosModelLoader {...status} loading={<LoadingMessage></LoadingMessage>}> (3) (4)
      <IngredientSelect
        disabled={false}
        onSelect={ingredientSelected}
      ></IngredientSelect>
    </KosModelLoader>
  );
});| 1 | wrap components that consume KOS models in the kosComponent HOC in order to activate observability and selective re-renders based ONLY on model properties consumed by this component |
| 2 | leverage the provided useIngredientContainerModel hook to resolve the model from the framework |
| 3 | the KosModelLoader component returned by the hook can be used as an entry guard. All children of the component will only be rendered once the model is available |
| 4 | optionally pass in a component that will be rendered while the model is loading |
For now we will just use a event handler that will present an alert when an ingredient is selected and the assigned button is pressed.
To visualize the data returned let’s create a component that can get the ingredient container model and render the list of ingredient names as a select and handle selection via a passed in event handler.
src/components/ingredient-container/ingredient-select.tsx
import React, { useEffect, useState } from "react";
import { useIngredientContainerModel } from "../../hooks/ingredient-container";
import { Button } from "../button";
import { Modal } from "../modal";
import "./ingredient.css";

interface Props {
  onSelect: (id: string) => void;
  disabled: boolean;
}
export const IngredientSelect: React.FunctionComponent<Props> = ({
  onSelect,
  disabled,
}) => {
  const [selected, setSelected] = useState("");
  const [show, setShow] = useState(false);
  const { model } = useIngredientContainerModel();  (1)
  useEffect(() => {
    if (model?.container) {
      setSelected(model.container.data[0].id);
    }
  }, [model]);
  const options = model?.container.data.map((ingredient) => {
    return (  (2)
      <div
        key={ingredient.id}
        onClick={() => setSelected(ingredient.id)}
        className={`ingredient ${ingredient.id === selected ? "selected" : ""}`}
      >
        {ingredient.name}
      </div>
    );
  });
  return (
    <>
      <Button disabled={disabled || !selected} onClick={() => setShow(true)}>
        Assign
      </Button>
      <Modal
        title={`Assign Ingredient`}
        onClose={() => setShow(false)}
        onSubmit={() => onSelect(selected)}
        show={show}
      >
        {options}
      </Modal>
    </>
  );
};| 1 | use the useIngredientContainerModel hook to resolve the singleton instance |
| 2 | use the model properties to render the component |
When using the KosModelLoader described above we have guarantees that this component will only be rendered if the model is available and in a ready state.
The component is using the cli-generated useIngredientContainerModel hook and is fetching the single instance of the IngredientContainerModel that is maintained in the framework cache.
There is a useEffect hook that is being used to set the default selection to the first item in the list.
The list of options is being rendered based on the data contained in the IngredientContainerModel.
| The framework will only create new instances of a give model type if it doesn’t exist already. The provided hook will return an existing instance if requested regardless of how many instances of components are rendered. The model framework is able to intelligently maintain the application state in a centralized way rather than relying on business logic finding it’s way into UI components. |
Updating the dispenser
To see your list of ingredients, add the IngredientContainerView to your DispenserView:
src/components/dispenser/dispenser.tsx
import { kosComponent, LoadingMessage } from "@coca-cola/kos-ui-components";
import React, { PropsWithChildren } from "react";
import { useDispenserModel } from "../../hooks/dispenser";
import { IngredientContainerView } from "../ingredient-container";

interface Props {}

export const DispenserView: React.FunctionComponent<PropsWithChildren<Props>> =
  kosComponent(function DispenserView() {
    const { status, KosModelLoader } = useDispenserModel();
    (1)
    return (
      <KosModelLoader {...status} loading={<LoadingMessage></LoadingMessage>}>
        <IngredientContainerView></IngredientContainerView>
      </KosModelLoader>
    );
});| 1 | add in the newly created IngredientContainerView to see the data on screen |
when you open your browser you should see the following:

Figure 1. Assign Button
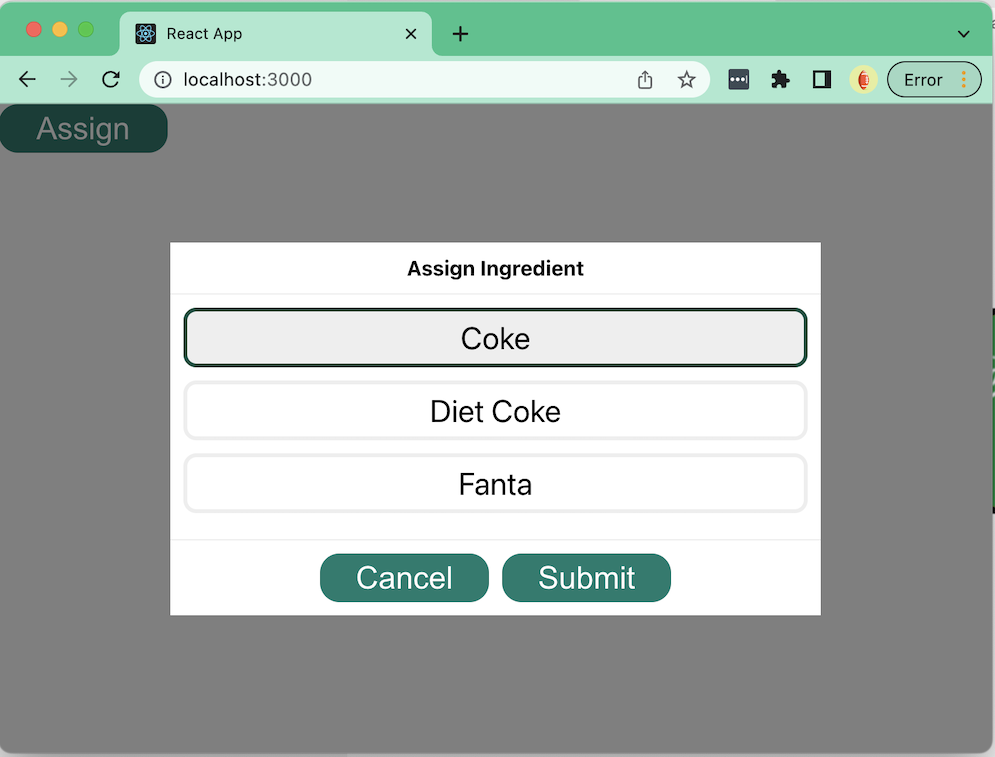
Figure 2. Select Modal
Details and code listings for the Button and Modal component can be found in the Git repo for this example.
|
Part 4: Holders
The last part of this journey is to use this ingredient selection control as part of a larger experience where a user can assign and unassign ingredients to a holder. The actual assignment events are sent asynchronously over the web socket where the UI should be able to synchronize the holder state using only a granular delta event.
Holder Model
We can start by using the CLI to create a new model. When prompted use the following:
npm run kos:model "Holder"> ingredient-assignment@0.1.0 kos:model > kosui create-kos-model "Holder" _ ___ ____ ____ _ ___ | | __/ _ \/ ___| / ___| | |_ _| | |/ / | | \___ \ | | | | | | | <| |_| |___) | | |___| |___ | | |_|\_\\___/|____/ \____|_____|___| ? Is the model a singleton? No ? Include data services? Yes ? Include a sample component? Yes ✔ +! 1 files added -> /src/models/holder/types/index.d.ts ✔ +! 2 files added -> /src/models/holder/index.ts -> /src/models/holder/holder-model.ts ✔ +! 2 files added -> /src/models/holder/services/index.ts -> /src/models/holder/services/holder-services.ts ✔ +! 0 files added -> ✔ +! 2 files added -> /src/components/holder/index.ts -> /src/components/holder/holder.tsx ✔ +! 2 files added -> /src/hooks/holder/index.ts -> /src/hooks/holder/use-holder.tsx
Holder interface
For the list of holder we need to define the interface in terms of data being passed in from the backend vs derived (computed values) and operations that can be performed by the model.
src/models/holder/types/index.d.ts
import { IKosDataModel } from "@coca-cola/kos-ui-core";

export interface IHolderOptions {
  // the name of the holder.  will be specified at creation time.
  name: string;
}

export interface IHolderModel extends IHolderOptions, IKosDataModel {

  // The model ID
  id: string;
  ingredient?: string;

  // updates the ingredient assignment
  // will be called by event handler when an assignment
  // event is received
  updateIngredientAssignment(ingredient?: string);  (1)

  // update the assigned ingredient for this holder
  assignIngredient: (id: string) => Promise<void>(2)

  // remove the assigned ingredient from this holder;
  deleteIngredient: () => Promise<void>(2)

  // derived value indicating whether this holder can
  // have an ingredient assigned.
  canAssign: boolean;  (3)
}| 1 | this is an action that can be used to update model state. |
| 2 | operations that can be used to interact with the backend. |
| 3 | computed value that will be derived from other parts of model state. The value can be derived from internal model state as well as from other dependent models. |
| All operations that are performed against the backend should be routed through a model. Be keeping the logic in the model layer, the UI components can be extremely thin and be primarily concerned with visual aspects. |
Holder Data Services
Holder Service
src/models/holder/services/holder-services.ts
import { ServiceFactory, resolveServiceUrl } from "@coca-cola/kos-ui-core";

(1)
interface Pump {
  category: string;
  inserted: boolean;
  beveragePour: boolean;
  ingredientPour: boolean;
  type: string;
  boardPath: string;
  nozzlePath: string;
  holderPath: string;
  name: string;
  path: string;
}

interface Holder {
  assembly: string;
  name: string;
  path: string;
  pumps: Pump[];
}


const { URL } = resolveServiceUrl("DISPENSER_SERVICE");
const { getAll } = ServiceFactory.build({
    basePath: `${URL}/api/holders`,  (2)
  });

/**
 * @category Service
 * Retrieves the initial dispenser data.
 */
 export const getHolders = async () => { (3)

    const response = await getAll<Holder>({});
    return response;
};| 1 | Pump type is not used in this exercise. For completeness, this data is added as it might be used in other parts of the UI. |
| 2 | set the path for the ServiceFactory |
| 3 | provide a data access function that will return the list of holders as a baseline |
Assignment Service
The backend provides an Assignment Controller that allows for the assignment of ingredients to a holder using the holder path and ingredient id. The UI service layer will provide access to these endpoint.
src/models/holder/services/assignment-services.ts
import { ServiceFactory, resolveServiceUrl } from "@coca-cola/kos-ui-core";
const { URL } = resolveServiceUrl("ASSIGNMENT_SERVICE");
const { getAll, postModel, deleteModel } = ServiceFactory.build({ (1)
    destinationAddress: "",
    basePath: `${URL}/api/assignments`, (2)
  });

export interface Assignment {
    ingredientId: string;
    holderPath: string;
    containerId?: string;

}
/**
 * @category Service
 * Retrieves the initial dispenser data.
 */
 export const getAssignments = async () => { (3)

    const response = await getAll<Assignment>({});
    return response;
  };

  export const addAssignment = async (assignment:Assignment) => {  (4)

    const response = await postModel({model: assignment});
    return response;
  };

  export const deleteAssignment = async (id: string) => {  (5)
    const response = await deleteModel({id});
    return response;
}| 1 | makes use of the getAll, postModel, and deleteModel operations provided by the assignment controller |
| 2 | set the path for invoking services. |
| 3 | provide a service function that can retrieve all existing assignments. This will ONLY be used on model load to establish a baseline. The model will be kept in sync using events. |
| 4 | makes a call to the backend to add an ingredient assignment |
| 5 | makes a call to the backend to remove an ingredient assignment |
Holder Model
The holder model will provide a simplified facade for the UI to interact with. In particular by having a holder model make the calls to the backend, it already understands it’s context minimizing the need for excessive use of useState throughout the React codebase. By centralizing state and operations into the model layer the UI can be kept "dumb".
src/models/holder/holder-model.ts
import {kosModel, KosLog, Kos} from "@coca-cola/kos-ui-core";
import {addAssignment, deleteAssignment} from "./services/assignment-services";

import {IHolderModel, IHolderOptions} from "./types";

const MODEL_TYPE = "holder-model";
const log = KosLog.getLogger("holder-model");

@kosModel<IHolderModel, IHolderOptions>(MODEL_TYPE)
export class HolderModel implements IHolderModel {
    id: string;
    name: string;
    private _ingredient?: string; (1)

    constructor(modelId: string, options: IHolderOptions) {
        this.id = modelId;
        this.name = options.name; (2)
        this._ingredient = "";
    }
    get ingredient() { (3)
        return this._ingredient;
    }

    updateIngredientAssignment(ingredient?: string) {  (4)
        this._ingredient = ingredient
    }

    async assignIngredient(ingredientId: string) {  (5)
        addAssignment({ingredientId, holderPath: this.id})
    }

    async deleteIngredient() {
        deleteAssignment(this.id);
    }

    get canAssign() {  (6)
        return !this._ingredient;
    }
}

const Registration = {
    registration: {
        [MODEL_TYPE]: {
            class: HolderModel
        }
    },
    type: MODEL_TYPE,
    factory: Kos.Factory.create<IHolderModel, IHolderOptions>(MODEL_TYPE)

}
export default Registration;| 1 | by using a private member, the model can limit direct mutation of the model. While not critical, it IS a best practice to ensure mutations are performed in via an action. |
| 2 | name is set via the options passed in through the constructor |
| 3 | use a getter as a means to define a computed value. The ingredient parameter will trigger a re-render in any observing components if the underlying value changes. |
| 4 | wrapping property assignments in a function will be treated as an action and provide predictable UI behavior by ensuring appropriate transaction boundaries are respected. |
| 5 | Exposes operations in context meaning the UI doesn’t need to keep track of the holder path and other information. |
| 6 | computed value. This boolean is computed based on the truthy/falsy value of the ingredient. An ingredient can only be assigned to a holder if it doesn’t already have an assignment. |
Update dispenser
We will start up updating the interface to include the collection of holders to be displayed
src/models/dispenser/types/index.d.ts
import { IKosDataModel, IKosModelContainer } from "@coca-cola/kos-ui-core";
import {IIngredientContainerModel} from "../../ingredient-container";

export interface IDispenserOptions {}

export interface IDispenserModel extends IDispenserOptions, IKosDataModel {
  id: string;
  ingredients: IIngredientContainerModel;
  holders: IKosModelContainer<IHolderModel>; (1)

}| 1 | model container for the list of holders from the backend |
The Dispenser implementation will be updated to include populating models based on the initial baseline fetched during model load. It will also have event handlers defined that can manage delta updates emitted over the websocket transport in response to events triggered both the
import { kosModel, KosLog, Kos, kosDependency, IKosModelContainer, KosModelContainer, kosTopicHandler } from "@coca-cola/kos-ui-core";
import { IDispenserModel, IDispenserOptions } from "./types";
import {IIngredientContainerModel, IngredientContainer} from "../ingredient-container";
import {Services, Holder, IHolderModel} from "../holder";
import {Assignment} from "../holder/services";
const MODEL_TYPE = "dispenser-model";

const log = KosLog.getLogger("dispenser-model");

@kosModel<IDispenserModel, IDispenserOptions>(MODEL_TYPE)
export class DispenserModel implements IDispenserModel {
  id: string;
  holders: IKosModelContainer<IHolderModel>;
  @kosDependency({modelType: IngredientContainer.type})
  ingredients!: IIngredientContainerModel;

  constructor(modelId: string) {
    log.debug("creating new instance of Dispenser Model");
    this.id = modelId;
    this.holders = new KosModelContainer(); (1)
  }

  async load(): Promise<void> {
    const holders = await Services.getHolders(); (2)
    holders?.data.forEach((holderData) => {
       const holder = Holder.factory(holderData.path)(holderData); (3)
       this.holders.addModel(holder);
    })
    const assignments = await Services.getAssignments(); (4)
    assignments?.data.forEach((assignment) => { (5)
       const holderPath = assignment.holderPath;
       const ingredientId = assignment.ingredientId;
       const ingredientModel = this.ingredients.container.getModel(ingredientId);
       const holder = this.holders.getModel(holderPath);

       if (holder && ingredientModel) {
         holder.updateIngredientAssignment(ingredientModel.name);
       }
    });
   }

(6)
   @kosTopicHandler({topic: "/kos/assignments/add", websocket: true, transform: (data) => {
       const assignment = JSON.parse(data.body);
       return assignment;
   }})
   addIngredientAssignment(data: Assignment) {
       const ingredientId = data.ingredientId;
       const ingredientModel = this.ingredients.container.getModel(ingredientId);
      const holder = this.holders.getModel(data.holderPath);
      if (holder && ingredientModel) {
        holder.updateIngredientAssignment(ingredientModel.name);
       }
   }

(7)
   @kosTopicHandler({topic: "/kos/assignments/remove", websocket: true, transform: (data) => {
       const assignment = JSON.parse(data.body);
       return assignment;
   }})
   removeIngredientAssignment(data: Assignment) {
       const holder = this.holders.getModel(data.holderPath);
       if (holder) {
           holder.updateIngredientAssignment();
       }
   }

   getChildren(){
       return [this.ingredients, ...this.holders.data] (8)
   }
}

const Registration = {
  registration: {
    [MODEL_TYPE]: {
      class: DispenserModel,
      singleton: true,
    },
  },
  type: MODEL_TYPE,
  factory: Kos.Factory.create<IDispenserModel, IDispenserOptions>(MODEL_TYPE),
};
export default Registration;| 1 | add a model container data structure for the holders |
| 2 | in the load lifecycle hook call the Holder Controller and get the list of holders for the dispenser |
| 3 | create new holder models using the Holder Factory and store them in the container |
| 4 | grab the list of assignments from the backend using the Assignment Controller via the service |
| 5 | for each assignment pull the holder out of the container and update the ingredient assignment using the holder updateIngredientAssignment action |
| 6 | listen for /kos/assignments/add events over the websocket and update the holder with the ingredient assignment if it exists. |
| 7 | listen for /kos/assignments/remove events and clear the assignment for the specified holder |
| 8 | include the list of holders as a child of the dispenser |
Topic Handlers
In the dispenser model there are two methods that are decorated with the @kosTopicHandler annotation. This will automatically subscribe to the specified topic and will be invoked whenever a message is received over the websocket.
The framework will automatically subscribe when the model is instantiated or activated and then unsubscribe again when the model is destroyed or deactivated.
Rendering the Holder UI
The last step is to create the UI Components for rendering the list of holders and hooking in the operations for assigning and removing ingredients assignments.
| The UI provided through this exercise is for learning purposes ONLY and should NOT be considered an appropriate experience for a production NCUI. There are a number issues and concerns that will be addressed in future notes including touch/tap behavior, screen resolution and density as well as the general interaction provided. The choice of components and interactions were used for expediency rather than for experience. |
Dispenser Updates
We will update the DispenserView to use a new holder component that will be created in the coming sections.
src/components/dispenser/dispenser.tsx
import { kosComponent, LoadingMessage } from "@coca-cola/kos-ui-components";
import React, { PropsWithChildren } from "react";
import { useDispenserModel } from "../../hooks/dispenser";
import { HolderContainer } from "../holder/holders";

interface Props {}

export const DispenserView: React.FunctionComponent<PropsWithChildren<Props>> =
  kosComponent(function DispenserView() {
    const { status, KosModelLoader } = useDispenserModel();
     (1)
    return (
      <KosModelLoader {...status} loading={<LoadingMessage></LoadingMessage>}>
        <HolderContainer></HolderContainer>
      </KosModelLoader>
    );
});| 1 | import and add the HolderContainer component as a child of the KosModelLoader |
HolderContainer
The Holder Container will grab the list of holders off the dispenser and render a Holder component for each item.
The DispenserModel is retrieved via a useContextModel hook that works in conjunction with the KosModelLoader component via its context. When ready, the fetched model will be available via context to any child components inside the KosModelLoader hierarchy. This allows for deeply nested components having access to the same instance of a model without relying on prop drilling or reloading of models.
the only difference between the useContextModel and the generic useKosModel hook employed by the cli-generated model hooks is that useContextModel has a simplified API and works on the assumption that the requested model is available by the time the hook is invoked. The useKosModel hook makes no assumption about the availability of the model and will create new instances of models that are not available in cache (provided the required configuration is provided to the hook). From a performance perspective, useContextModel SHOULD be slightly better, however the difference is negligible.
|
src/components/holder/holders.tsx
import { kosComponent, useContextModel } from "@coca-cola/kos-ui-components";
import React from "react";
import { IDispenserModel } from "../../models/dispenser";

import { Holder } from "./holder";
import "./holder.css";

export const HolderContainer: React.FunctionComponent = kosComponent(
  function HolderContainer() {
    const dispenser = useContextModel<IDispenserModel>(); (1)
    const holders =
      dispenser?.holders.data.map((holder) => { (2)
        return <Holder key={holder.id} holder={holder}></Holder>;
      }) || [];
    return <div className={"holder-container"}>{holders}</div>;
  }
);| 1 | use the useContextModel hook to retrieve the global dispenser model. |
| 2 | create a Holder component for each holder model in the container. Pass the holder model directly into the component. |
| When possible pass the model into components rather than destructuring and passing individual properties. This will give better performance and will help with keeping the observable boundaries clear. |
Holder
The Holder component is responsible for displaying the holder and the corresponding ingredient assignment. It will make use of the IngredientSelect created earlier to allow the user to select an ingredient for a given holder.
The component is making all of it’s visual decisions based on model properties with no use of internal state.
All operations are routed through the model rather than making network requests directly. This allows the model to control the flow of information and allows the reactive nature of the model to be used.
If an assignment event is received by the model resulting in the assigned ingredient on the holder model to be updated, only the holder component associated with the changed model will be re-rendered. These sorts of targeted rendering updates makes for a more performant frontend.
src/components/holder/holder.tsx
import { kosComponent } from "@coca-cola/kos-ui-components";
import React from "react";
import { IHolderModel } from "../../models/holder";
import { IngredientSelect } from "../ingredient-container/ingredient-select";

import "./holder.css";

interface Props {
  holder: IHolderModel;
}
export const Holder: React.FunctionComponent<Props> = kosComponent( (1)
  function Holder({ holder }) {
    const holderClasses = [holder.canAssign && "not-assigned", "holder"]
      .filter(Boolean)
      .join(" ");
    return (
      <div className={holderClasses}>
        <div>{holder.name}</div>
        <div>{holder.ingredient || "Not Assigned"}</div>
        {holder.canAssign ? (
          <div>
            <IngredientSelect
              disabled={!holder.canAssign}
              onSelect={(ingredientId) => holder.assignIngredient(ingredientId)}
            ></IngredientSelect>
          </div>
        ) : (
          <div>
            <button
              disabled={holder.canAssign}
              onClick={() => holder.deleteIngredient()}
            >
              Unassign
            </button>
          </div>
        )}
      </div>
    );
  }
);| Ingredient Assignment and Un-Assignment are both handled through the Holder model. This results in a very thin UI component with minimal business logic. Almost all of the control flow is related to visual presentation and less about complex calculations. |
Holder Styles
Lastly, we can add some styles to the Holder model to provide some visual cues when assignments are made or available.
src/components/holder/holder.css
.holder {
width: 150px;
height: 100px;
border: solid 1px black;
margin: 10px;
display: flex;
flex-direction: column;
justify-content: space-around;
padding: 8px;
border-radius: 10px;
transition: background-color 500ms linear;
}
.holder.not-assigned {
border: solid 1px #025043;
background-color: #b3e0dc;
}
.holder-container {
display: flex;
flex-wrap: wrap;
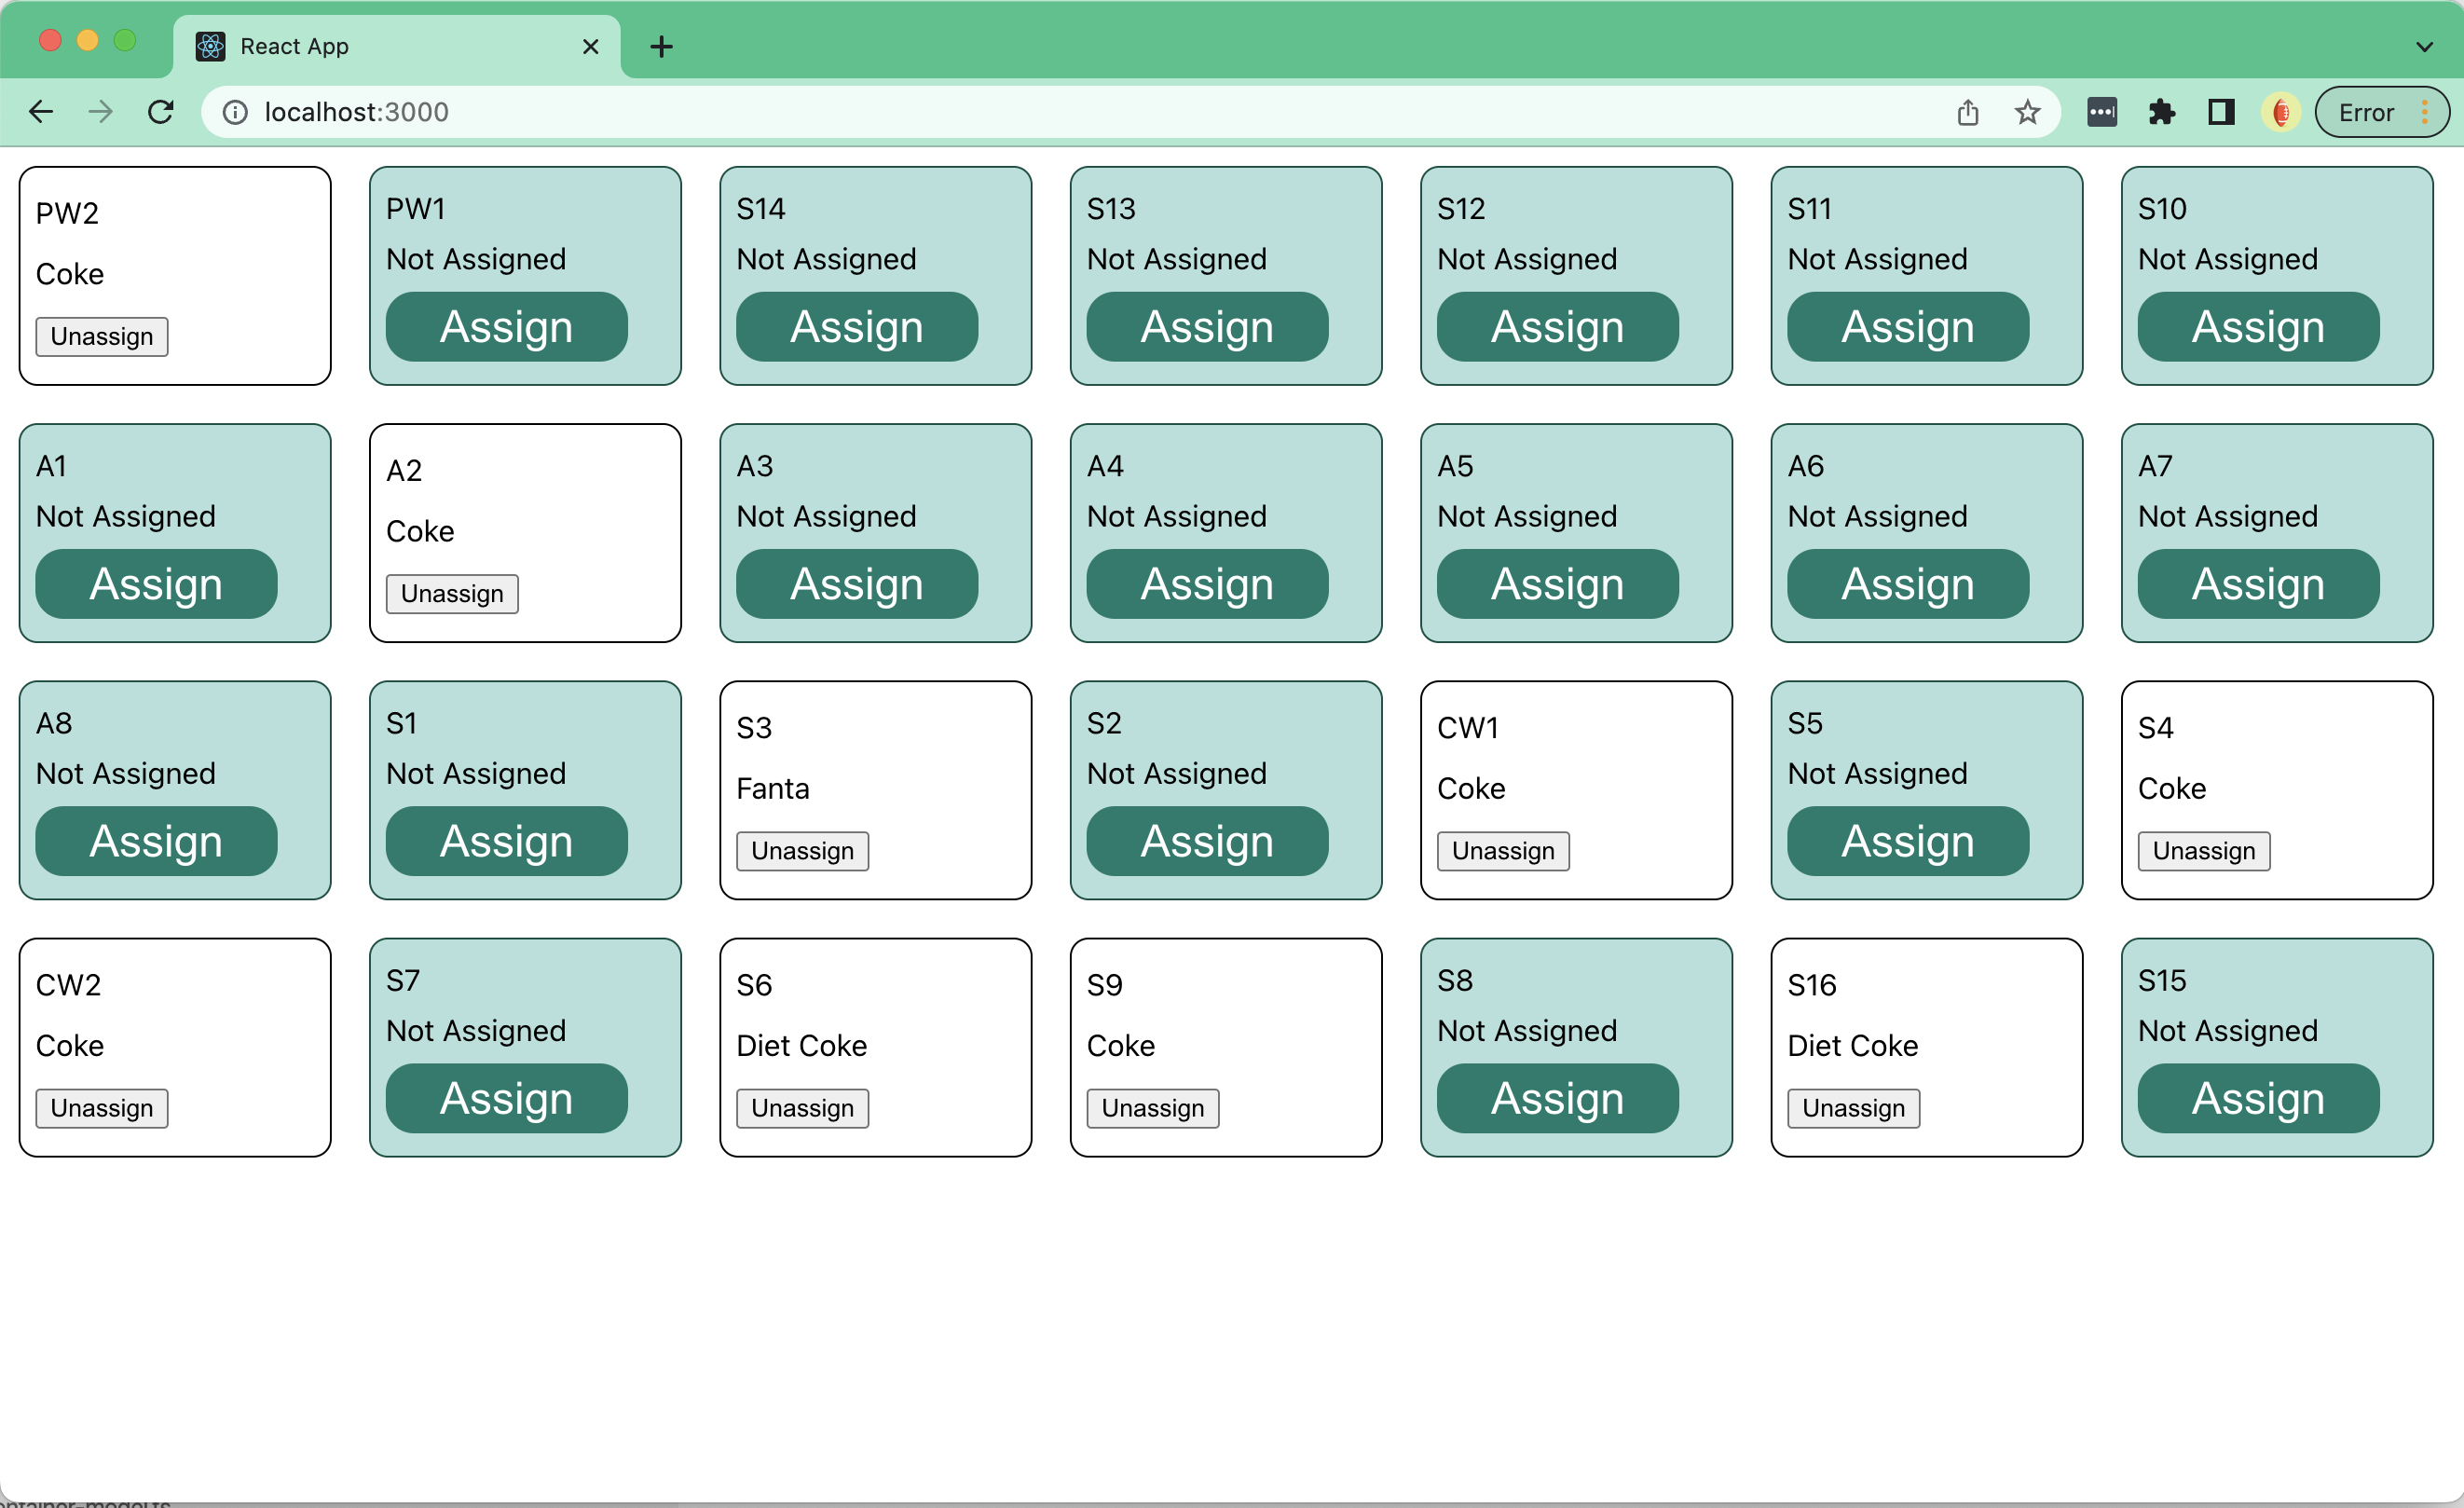
}Result
The final result, after loading the UI in a browser should look like this:
In this exercise, we covered a number of critical use cases that demonstrate how the KOS UI SDK can be use to make building frontend for dispenser applications easier:
-
use of the KOS UI Project Template to scaffold out the base project
-
use of the KOS CLI to help with scaffolding out models and components
-
creating container models to manage collections of models
-
use data services to interact with backend controllers
-
use topic handlers to listen to delta events used to keep models in sync with the backend state
-
connecting models to UI Components through SDK and CLI provided hooks
| The code for the example can be found the following git repo https://github.com/markpomerant/ingredient-assignment |
On this page
Java Development
Seamlessly transition from Legacy+ systems to Freestyle microdosing and advanced distributed dispense systems.
UI Development
Using KOS SDKs, integrating Consumer and Non-consumer facing UIs becomes seamless, giving you less hassle and more time to create.
Video Library
Meet some of our development team, as they lead you through the tools, features, and tips and tricks of various KOS tools.
Resources
Familiarize yourself with KOS terminology, our reference materials, and explore additional resources that complement your KOS journey.
Copyright © 2024 TCCC. All rights reserved.