@Getter @Setter
public class DemoIngredient extends BaseIngredient {
    // IDs for key ingredients:
    public static final String WATER = "1";
    public static final String CARB  = "2";

    private Type type;  // ingredient type

    public enum Type {
        PLAIN_BEV,
        CARB_BEV,
        WATER,
        CARB
    }
}Java Extensions
Ingredients as Beverages
Introduction
Consider a legacy style dispenser with BiB ingredients, which when mixed with plain or carbonated water, represent finished beverages. What does it take within KOS to pour these beverages, and how does the process differ when using more complex component-based pouring such as micro-dosed recipes?
This application note provides a simple demonstration of pouring BiB-based beverages, while examining related issues such as beverage availability and defining brands and groups to categorize beverages. It also examines how to handle multiple instances of the same ingredient, and how to compute the actual pumps to use to pour a beverage.
Overview
This app note defines a simple set of ingredients for the sake of demonstrating concepts. The intent is not to prescribe ingredient formats. While this note makes mention of endpoints and websocket events, it does not get into details about building a user interface. For the sake of brevity, it also ignores certain concepts such as beverage selection and pouring, which are addressed in another app note that will address the BeveragePourEngine in more detail.
Also, this app note builds upon the dispenser defined in Basic Dispenser. It adds a simple set of ingredients and then builds a BeverageNozzlePipeline that is used to pour a beverage.
Part 1: Adding Ingredients
Ingredients within KOS are managed by IngredientService. This service provides access to ingredient data either by iterating a list of available ingredients, or by looking up an ingredient by ID. IngredientService doesn’t know anything about ingredients other than what’s in the BaseIngredient base class, but it provides a central place within KOS where ingredients are installed and updated.
Ingredients are provided to IngredientService through the IngredientSource interface. This allows applications to load ingredients from any source, and install those ingredients into the service atomically. The IngredientSource interface also allows applications to build complex sources that combine multiple sources of ingredient data, if needed.
Having a central source for ingredient data means that it can be used uniformly throughout the system. For example, the insertion process, which assigns an ingredient to a pump, prevents insertions for unknown ingredients. Similarly, when new ingredients are installed, any existing ingredient mappings are checked, essentially blocking unknown ingredients from pouring.
For this exercise we need ingredients, which we define by extending the BaseIngredient class:
Define water and carbonation ingredients
Using DemoIngredient, we define the following DemoBrandSet class that implements IngredientSource:
Create class that holds all ingredients:
public class DemoBrandSet implements IngredientSource {
    private final Map<String, DemoIngredient> ingredients = new HashMap<>();

    public DemoBrandSet() {
        add(DemoIngredient.WATER, "water", Type.WATER);
        add(DemoIngredient.CARB,  "carb",  Type.CARB);

        add("10", "Coke",   Type.CARB_BEV);
        add("11", "Sprite", Type.CARB_BEV);
        add("12", "Fanta",  Type.CARB_BEV);
    }

    private void add(String id, String name, Type type) {
        DemoIngredient ing = new DemoIngredient();
        ing.setId(id);
        ing.setName(name);
        ing.setType(type);
        ingredients.put(id, ing);
    }

    @Override
    public Ingredient getIngredient(String id) {
        return ingredients.get(id);
    }

    @Override
    public Collection<? extends Ingredient> getIngredients() {
        return ingredients.values();
    }
}
The types PLAIN_BEV and CARB_BEV indicate that the ingredient should be poured with plain or carbonated water to result in a beverage.
In a real implementation, a brandset reader would be used to load ingredients from a data file, but for now this ingredient list will suffice.
To install the ingredients, we "install" the DemoBrandSet class from the application’s start() method:
In our application class, add in our brand set:
public class DispenserApp extends SystemApplication {
    @Autowired
    private IngredientService ingredientService;

    @Override
    public void start() {
        // Install ingredients:
        ingredientService.setSource(new DemoBrandSet());

        // Install the demo assembly:
        install(new DemoAssembly());
    }
}
Inserting ingredients
The Inserting Ingredients application note provides details about how to insert ingredients using KOS. However, for the sake of this demonstration, we insert ingredients as intrinsics (which are typically reserved for water and carb). Please review the app note mentioned above for details about intrinsics and the ingredient insertion process in general.
Building on the example provided in the insertion application note, we insert our ingredients as shown below:
Insert all ingredients into our assembly class:
public class DemoAssembly extends CoreAssembly {
    @Autowired
    private InsertionService insertionService;
    private DemoBoard board;

    public DemoAssembly() {
        // Create a nozzle and add it to the assembly:
        Nozzle nozzle = new Nozzle(this, "myNozzle");
        add(nozzle);

        // Create a board and add it to the assembly:
        board = new DemoBoard(this, "myBoard");
        add(board);

        // Add the pumps from the board to the nozzle:
        nozzle.add(board.getWaterValve());
        nozzle.add(board.getCarbValve());
        nozzle.add(board.getSyrups());

        // Create the water holders:
        add(new Holder(this, "PW", board.getWaterValve());
        add(new Holder(this, "CW", board.getCarbValve());

        // Create the syrup holders:
        int i = 1;
        for (Pump<?> pump : board.getSyrups()) {
            add(new Holder(this, "S" + (i++), pump));
        }
    }

    @Override
    public void install() {
    }

    @Override
    public void postInstall() {
        // Insert water and carb as intrinsic ingredients:
        insertionService.insertIntrinsic(DemoIngredient.WATER, board.getWaterValve().getHolder());
        insertionService.insertIntrinsic(DemoIngredient.CARB, board.getCarbValve().getHolder());

        // Add beverage ingredients:
        insertionService.insertIntrinsic("10", board.getSyrups().get(0).getHolder());
        insertionService.insertIntrinsic("11", board.getSyrups().get(1).getHolder());
        insertionService.insertIntrinsic("12", board.getSyrups().get(2).getHolder());
        insertionService.insertIntrinsic("13", board.getSyrups().get(3).getHolder());
    }
}
Part 2 : Adding BeveragePourEngine and Pipeline
To pour from a nozzle we must add a NozzlePipeline. Since we want to pour beverages, we’re going to use BeverageNozzlePipeline. This class requires a custom BeveragePourEngine implementation, so let’s start with a minimal pour engine.
Define a minimal pour engine:
public class DemoPourEngine extends BeveragePourEngine<BeveragePourEngineConfig> {
    @Autowired
    private IngredientService ingredientService;

    @Override
    public void start() {
    }

    @Override
    public void stop() {
    }

    @Override
    public void rebuildGraph(BevGraphBuilder builder) {
    }

    @Override
    public Pourable getPourable(String id) {
        return null;
    }

    @Override
    public FutureWork pour(Pourable pourable, double volume) {
        return null;
    }
}
Next, we create the pipeline and add to the nozzle in the Assembly:
Create and add a pipeline to our assembly:
    // . . .
    public DemoAssembly() {
        // Create a nozzle and add it to the assembly:
        Nozzle nozzle = new Nozzle(this, "myNozzle");
        add(nozzle);

        // Add the pour pipeline:
        DemoPourEngine engine = new DemoPourEngine();
        BeverageNozzlePipeline pourPipeline = new BeverageNozzlePipeline(engine);
        nozzle.add(pourPipeline);
    // . . .
If we were to run this code, DemoPourEngine.start() would be called, followed by a call to DemoPourEngine.rebuildGraph(). What does any of this have to do with pouring ingredients?
BeveragePourEngine
The BeveragePourEngine portion of the pour pipeline is ultimately responsible for pouring a beverage. That is, given a particular beverage, it must turn on the correct pumps.
We’ve already seen in previous application notes that every pump supports tpour() and vpour(), so ignoring any custom hardware functionality available to coordinate a beverage pour, we can at least coordinate tpour() calls to effectively pour a beverage. Given we can technically pour, how do we know which pumps to use?
If we take a step back there are a few pieces missing from our picture. Let’s have a look at the steps involved in a typical pour operation:
- List of beverages
-
How does the UI know what the list of beverages are?
- Availability of beverages
-
How does the UI know if a beverage can actually be poured (what if an ingredient is sold out)?
- Groupings of beverages
-
Are beverages to be grouped into brands or categories? If so, how does the UI know if it should show a group, given it probably shouldn’t show groups that are empty?
- Beverage ID
-
What ID should be used to select a beverage?
- Determining pumps
-
Given a beverage, how do we determine which pumps to turn on to pour it?
It turns out that BeveragePourEngine solves all of these problems by creating a BevGraph.
Part 3 : BevGraph
KOS utilizes a unique dependency graph to describe how ingredients are related to form beverages.
This BevGraph describes basic legacy dispensers; beverages constructed from multiple variations of micro-dosed recipes, with multiple duplicate ingredients; and even beverages defined as ratios of other beverages.
For our current example, let’s start with a legacy dispenser, where we’ll examine how to describe beverages to the "pour engine".
Nodes and dependencies
A BevGraph is constructed from GraphNode objects, which are then linked together to form dependency relationships. Commonly, these nodes are created in layers, where each layer has a series of dependencies to the next layer.
For example, the diagram below represents two nodes: A and B, where "A depends on B":
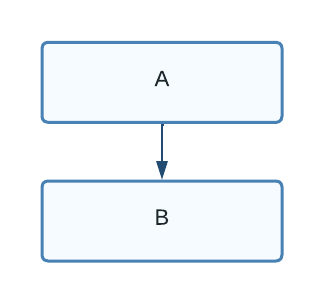
Figure 1. "A" depends on "B"
In the next diagram, node A depends on two nodes, B1 and B2:
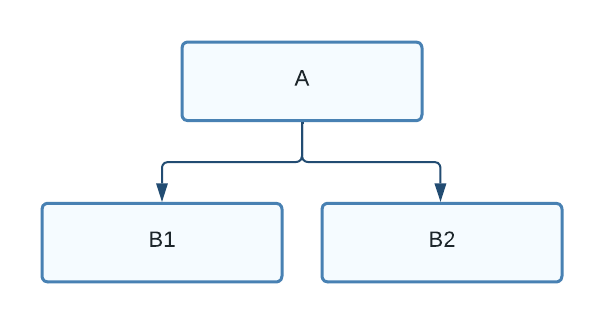
Figure 2. "A" depends on both "B1" and "B2"
What does a dependency mean? It represents a concept called availability, which consists of two separate attributes:
- visible
-
A visible beverage is displayed to the user, while a non-visible beverage is not.
- available
-
An available beverage is selectable and pourable, while an unavailable beverage is disabled. For example, when an ingredient is sold out, it is displayed as disabled; perhaps its icon is grayed-out.
Each node in the graph determines whether a beverage is visible and/or available. Parent nodes refer to their child nodes to determine their state.
Consider the following graph:
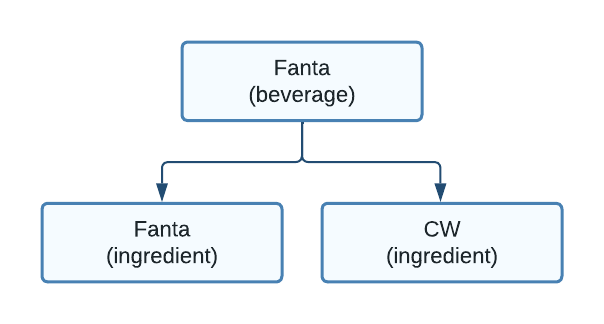
Figure 3. A beverage that depends on two ingredients
Here we see that the Fanta beverage is only available if both ingredients are available. For example, if the ingredient Fanta was sold out, then the Fanta beverage could not be poured.
Instead of ingredients and beverages, let’s consider beverages and brands:

Figure 4. A brand that depends on one or more beverages
Using this diagram, the user interface could first show the user a selection of brands, and then after choosing one, display the available beverages within that brand.
This example defines a brand named "Coke", which depends on beverages "Coke" and "Cherry Coke". In this case, the brand should be available if any of its associated beverages are available.
These two examples demonstrate that different types of nodes can have different ways of evaluating their state. While a subclass of GraphNode can implement any custom logic, KOS provides AndNode and OrNode to use as basic building blocks. Let’s return to our ingredient/beverage example from above with a slightly different annotation:
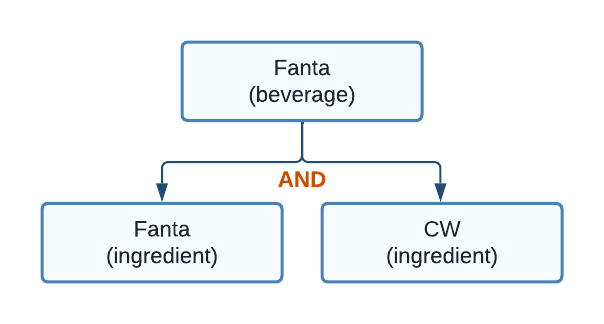
Figure 5. A beverage that depends on two ingredients
This diagram illustrates that the beverage node is using an AND relationship for availability. Let’s take a that bit further:
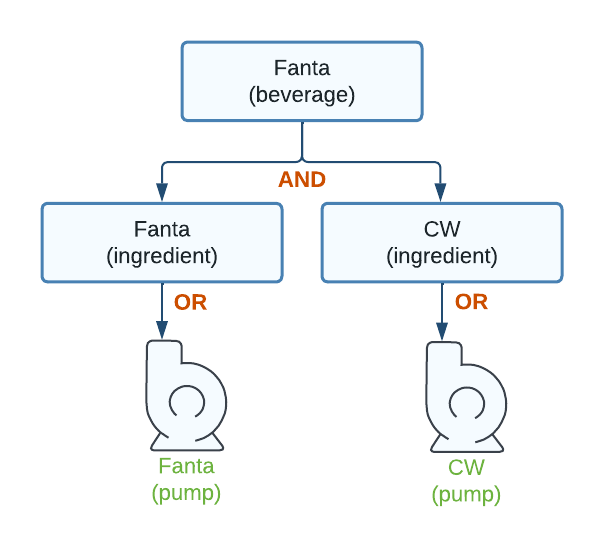
Figure 6. Beverages with ingredients and pumps
This is basically the same graph as before with the introduction of pumps. This makes sense as ingredients are assigned to pumps. But why have the ingredient nodes between pump and beverage nodes? Why not just replace the ingredient nodes used previous with pump nodes?
The introduction of ingredient nodes as OR nodes allows for another interesting use case. What happens if Fanta is assigned to two pumps?
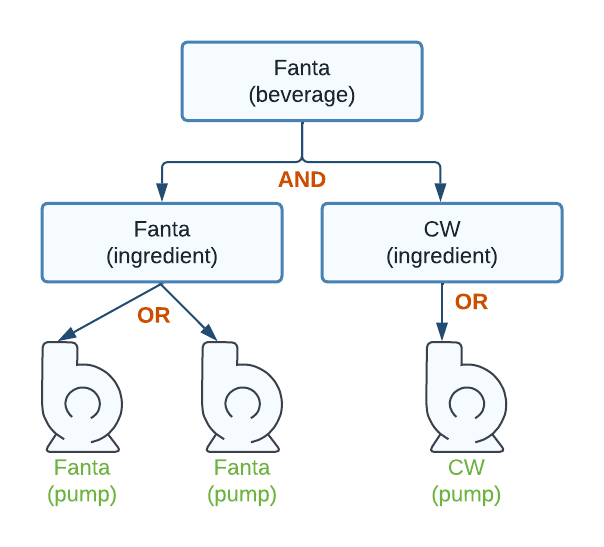
Figure 7. Two pumps for a single ingredient
Now there are two pumps feeding into the Fanta ingredient. Since the ingredient is an OR node, the ingredient is available as long as either Fanta pump is available. This simple graph demonstrates that the beverage Fanta can be poured as long as either Fanta pump is available.
Now, let’s consider this graph:
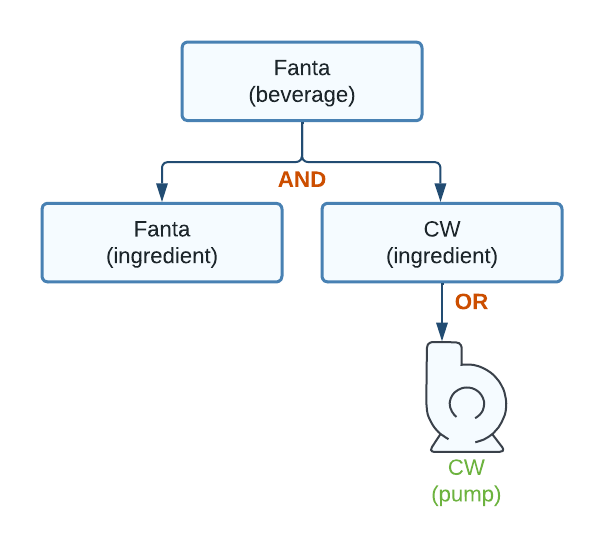
Figure 8. No pump for an ingredient
This diagram describes an ingredient node for Fanta without an associated pump. An AND or an OR node with no children will always return non-visible, which causes Fanta to be hidden in the UI.
If we build nodes for every pump, ingredient, and beverage, then the graph gives us LOTS of information:
- List of beverages
-
We know every beverage in the system because they were added to the graph.
- What beverages to show to the user
-
Only beverages flagged as "visible" are displayed to the user, as the graph causes all incomplete beverages to be non-visible.
- What beverages are pourable
-
If the "available" flag is true, then the beverage can be poured. If the pump becomes unavailable (for example, sold out), then the availability flag becomes false and ripples up the graph. If there are multiple ways to pour a beverage, then the graph automatically finds them and reflects the results in the availability information.
- How to pour a beverage
-
Yes, it turns out we know this too. If you start at a beverage node and work down, you can find all the pumps required to pour the beverage. KOS includes a class, RecipeExtractor, that automatically handles this, given a beverage node. It identifies duplicate ways to pour ingredients, and selects the best option based on "node rank".
If we extend this graph just a bit more, we can also include automatic calculation of brands as well:
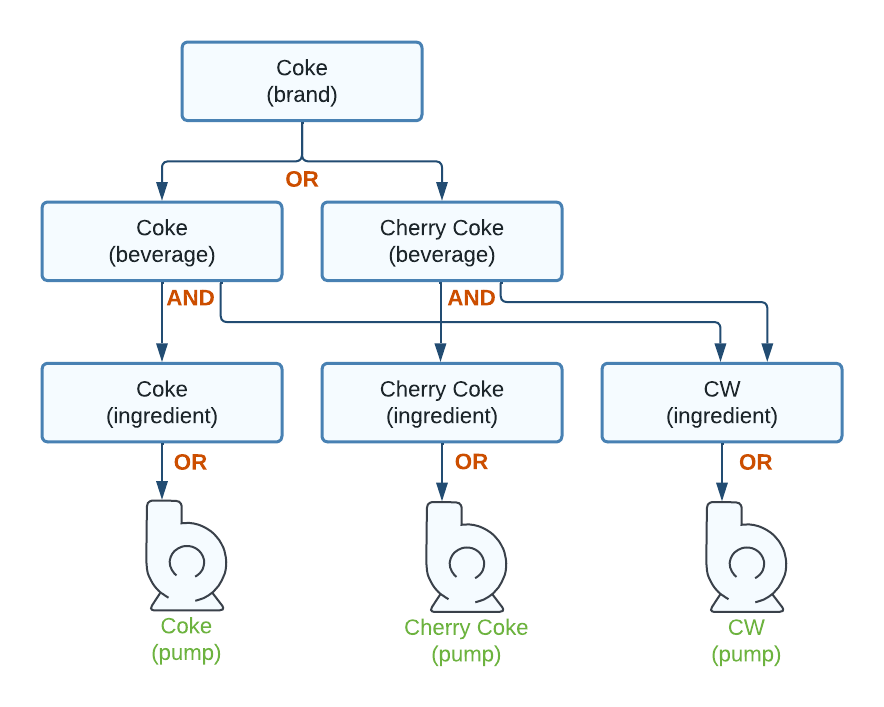
Figure 9. Brand - Beverages - Ingredients - Pumps
If either Coke or Cherry Coke is available to pour, then the Coke brand is available to select. If both are unavailable (for example, both sold out or carbonation failure), then the Coke brand is disabled.
Building a graph
Let’s look at what it takes to build a graph in our DemoPourEngine by focusing on one method:
Override the
BeveragePourEngine.rebuildGraph() method:public class DemoPourEngine extends BeveragePourEngine<BeveragePourEngineConfig> {
@Override
public void rebuildGraph(BevGraphBuilder builder) {
}
}KOS calls this method whenever a change occurs in the system which might impact the contents of the graph. For example, when a new ingredient is assigned or a new set of ingredients are installed.
Step #1: First off, we create the nodes for the pumps, as they’re at the "bottom" of the graph. As it turns out, we can skip this as BevGraphBuilder does this automatically. But how do we find the nodes that were automatically created? All nodes are assigned an ID when they are created, and it’s up to the developer to ensure these IDs are unique within the graph. When the builder adds the pump nodes, they are added using the pump handle path as the ID.
Step #2: With the pumps taken care of, now we create the ingredient nodes, which sit on top of the pumps. We do this automatically by simply calling builder.addIngredientNodes(). Our engine now looks like this:
Call the BevGraphBuilder.addIngredientNodes() method:
public class DemoPourEngine extends BeveragePourEngine<BeveragePourEngineConfig> {
    @Override
    public void rebuildGraph(BevGraphBuilder builder) {
        // Add ingredient nodes for all the pumps:
        builder.addIngredientNodes();
    }
}
Step 3: After that, we create the beverage nodes. This is a more complex because we must know how ingredients are combined to form a beverage. In our DemoIngredient class, we encoded this data into the type of the ingredient. This means all we need to do is iterate through all the ingredients and figure out what to do with them. It would be more efficient to only process ingredients that are actually inserted so that we don’t have to create a bunch of beverages that will simply be marked not-visible due to missing ingredients.
Luckily, the builder has a list of ingredients extracted from the pumps, so we can use that. Here is the updated method after grabbing the ingredient IDs from the builder, fetching the ingredients from the engine, and then performing a switch on the ingredient type:
Process ingredients:
public class DemoPourEngine extends BeveragePourEngine<BeveragePourEngineConfig> {
    @Override
    public void rebuildGraph(BevGraphBuilder builder) {
        // Add ingredient nodes for all the pumps:
        builder.addIngredientNodes();

        // Process ingredients available in the builder:
        for (String ingredientId : builder.getIngredientIds()) {
            // Lookup the ingredient:
            DemoIngredient ing = (DemoIngredient)getIngredient(ingredientId);

            // Construct a beverage from the ingredient:
            switch (ing.getType()) {
                // Combine with plain water to form a beverage:
                case PLAIN_BEV:
                    break;

                // Combine with carbonated water to form a beverage:
                case CARB_BEV:
                    break;

                // Plain and carbonated water don't have any other ingredients:
                default:
                    break;
            }
        }
    }
}
Step 4: With the scaffolding now in place, we next need to create beverage nodes and add some dependencies. In our example, every ingredient in our master ingredient list is ultimately a beverage. Even plain and carbonated water are beverages. This means we can safely create a beverage node for every ingredient we find, which we do by calling builder.add(new BeverageNode(bevId)). The only problem is that we need a unique ID for the beverage node.
This is a good time to pause and talk about node IDs. We already know that the IDs for pump nodes are the handle paths of the pumps. These are going to be unique and not likely to collide with ingredient or beverage IDs. Next are ingredient nodes, which are created by the builder when we called addIngredientNodes(). What IDs are used for these? Since the only IDs available are the ingredient IDs, the builder used these for the ingredient node IDs. But what if this causes a collision with beverage node IDs? In our example we have no pre-assigned IDs, as we made up our own ingredients, and we don’t have a real brandset with beverages and brands. In a real system it can be expected that the UI provides data with beverage and brand IDs that tie to other assets like icons, names, translations, and so on. The system that generated this data may assume that beverages and brands are separate domains and can safely have overlapping IDs.
When working with GraphNode objects we have an easy solution. Every node has a unique ID for the node, but also supports an altId property which is exposed via endpoints along with the node ID. This means we can store the potentially colliding IDs in altId and create synthetic keys for our node IDs. The UI can simply use id or altId, based on how the developer decided to implement the graph. Even though ingredient IDs aren’t exposed via pour-related endpoints, there is still a way to create synthetic IDs and use the actual ingredient IDs as altId. This can be done by calling builder.addIngredientNode(prefix), which specifies a prefix to add to the ingredient node IDs when the nodes are created.
In our example, we’re going to stick with ingredient IDs for ingredient nodes and create synthetic IDs for the beverage nodes since we don’t have a UI. For every ingredient we can create a beverage node using a "bev:" prefix on the ingredient ID as follows:
        // . . .
        // Process ingredients available in the builder:
        for (String ingredientId : builder.getIngredientIds()) {
            // Lookup the ingredient:
            DemoIngredient ing = (DemoIngredient)getIngredient(ingredientId);

            // Build a beverage for the ingredient:
            String bevId = "bev:" + ing.getId();
            builder.add(new BeverageNode(bevId));
            // . . .
        }
Step 5: Now that we have the beverage nodes, we need to add the dependent ingredients. The first one is the ingredient we just created the node for. We can add this by calling builder.addChild(parentId, childId) :
        // . . .
        // Process ingredients available in the builder:
        for (String ingredientId : builder.getIngredientIds()) {
            // Lookup the ingredient:
            DemoIngredient ing = (DemoIngredient)getIngredient(ingredientId);

            // Build a beverage for the ingredient:
            String bevId = "bev:" + ing.getId();
            builder.add(new BeverageNode(bevId));
            builder.addChild(bevId, ing.getId());
            // . . .
        }
Notice that in the builder, dependencies are created using IDs and not the actual nodes. This means it’s possible to set up dependencies for nodes that don’t exist yet. If you never create the node, then the builder will throw an error about a missing node when the graph is built.
Step 6: With the beverage node created and the ingredient added, the only remaining step is to determine what other ingredient to add to the beverage (water or carb). For this we can use the switch statement on the ingredient type to add the missing ingredient:
    // . . .
    @Override
    public void rebuildGraph(BevGraphBuilder builder) {
        // add ingredient nodes for all the pumps
        builder.addIngredientNodes();

        // Process ingredients available in the builder:
        for (String ingredientId : builder.getIngredientIds()) {
            // Lookup the ingredient:
            DemoIngredient ing = (DemoIngredient)getIngredient(ingredientId);

            // Build a beverage for the ingredient:
            String bevId = "bev:" + ing.getId();
            builder.add(new BeverageNode(bevId));
            builder.addChild(bevId, ing.getId());

            // Construct a beverage from the ingredient:
            switch (ing.getType()) {
                // Combine with plain water to form a beverage:
                case PLAIN_BEV:
                    builder.addChild(bevId, DemoIngredient.WATER);
                    break;

                // Combine with carbonated water to form a beverage:
                case CARB_BEV:
                    builder.addChild(bevId, DemoIngredient.CARB);
                    break;

                // Plain and carbonated water don't have any other ingredients:
                default:
                    break;
            }
        }
    }
    // . . .
We now have a complete graph, although there is still one piece missing. How does KOS know about our beverages?
Step 7: The final step is to tell the builder which nodes we want in our beverage list by using builder.addBev(bevId) right after we create the beverage node:
            // . . .
            // Build a beverage for the ingredient
            String bevId = "bev:" + ing.getId();
            builder.add(new BeverageNode(bevId));
            builder.addChild(bevId, ing.getId());
            builder.addBev(bevId);
            // . . .
Trying it out
Our engine now builds a graph, but how do we see the results and try changing things to make sure it actually works?
The first endpoint to try is the "availability" endpoint. This returns the availability of all registered beverages, brands, and groups. We don’t use brands and groups in our example, but you can read about them in BevGraphBuilder. The availability endpoint is relative to the nozzle, as it’s installed as a pipeline. Based on the app note that set up the nozzle, the endpoint is:
GET /api/nozzle/myNozzle/pipeline/beverage/availability
As all ingredients are installed and available, all beverages should be visible and available. To test blocking and unblocking pumps while watching availability change, you should create a new Trouble class and add a controller class to your application. The discussion of these is beyond this app note, but here is the code that can be used:
public class BlockPumpTrouble extends Trouble {

    public BlockPumpTrouble(Pump<?> pump) {
        blockBeveragePour(pump);
        addImpacted(pump);
    }
}
@ApiController(base = "/test",
title = "Test controller",
desc = "Endpoints to test availability")
public class TestController {
@Autowired
private TroubleService troubleService;
@ApiEndpoint(POST = "/block/{path}",
desc = "Add a blocking trouble to the specified pump.")
public void blockPump(@HandleVariable("path") Pump<?> pump) {
troubleService.add(new BlockPumpTrouble(pump));
}
@ApiEndpoint(DELETE = "/block/{path}",
desc = "Remove a blocking trouble to the specified pump.")
public void unblockPump(@HandleVariable("path") Pump<?> pump) {
troubleService.removeTroubles(t -> (t instanceof BlockPumpTrouble) && t.isImpacted(pump));
}
}In order for TestController to be used, it will need to be added to the context in the system app:
public class DispenserApp extends SystemApplication {

    @Override
    public void load() throws Exception {
        getCtx().add(new TestController());
    }

    @Override
    public void start() {
        // Install the demo assembly:
        install(new DemoAssembly());
    }
}
It is now possible to add and remove a blocking Trouble to a pump and see the impact on availability. Use the endpoints below to add/remove the troubles:
POST   /api/system/test/block/{pumpPath}   # add a blocking Trouble
DELETE /api/system/test/block/{pumpPath}   # remove the blocking Trouble
Based on the app note that defined the assembly, the carb water pump would be: assembly.core.board:myBoard.pump:cw. Therefore, to block/unblock carb water:
POST   /api/system/test/block/assembly.core.board:myBoard.pump:cw   # block carb water pump
DELETE /api/system/test/block/assembly.core.board:myBoard.pump:cw   # unblock carb water pump
After blocking carb water, all beverages should become unavailable. By switching the pump path you can try different combinations. Notice that pumps S1 and S4 both have Coke assigned, so you can also verify that disabling one source of Coke doesn’t impact the availability of Coke as a beverage.
Any time availability changes there is also a websocket event. By using a websocket client, you can subscribe to this event and watch realtime notifications as pumps are blocked and unblocked. To see these events, point your websocket client to localhost:8081 and make a connection. Then send the following message exactly at it appears, including the blank line in the middle:
type:kos.broker.subscribe

["/nozzle/*"]
This subscribes to all nozzle events. When you use the endpoints to change availability, you’ll see events over the websocket. You can also see that only availability deltas are sent in the message, so if you block or unblock carb, all beverages are in the list (aside from water, which doesn’t depend on carb). If you block/unblock water, only that beverage is in the list.
Finally, there is also an endpoint that shows you a downward looking view of the graph starting at a specified node ID:
GET /api/nozzle/myNozzle/pipeline/beverage/graph/node/{nodeId}
On this page
Java Development
Seamlessly transition from Legacy+ systems to Freestyle microdosing and advanced distributed dispense systems.
UI Development
Using KOS SDKs, integrating Consumer and Non-consumer facing UIs becomes seamless, giving you less hassle and more time to create.
Video Library
Meet some of our development team, as they lead you through the tools, features, and tips and tricks of various KOS tools.
Resources
Familiarize yourself with KOS terminology, our reference materials, and explore additional resources that complement your KOS journey.
Copyright © 2024 TCCC. All rights reserved.