database name: "dbname"
schema version: 0

table: "users"
field 1: "id" (integer, primary key)
field 2: "first_name" (text)
field 3: "last_name" (text)

table: "options"
field 1: "name" (text, primary key)
field 2: "value" (text)Java Reference
DatabaseMigrator
Introduction
This page explains how to write your custom database migrator using the KOS interface DatabaseMigrator. It gives an example of creating the initial database schema (#0), followed by a modification to that schema (#1). These two examples demonstrate how easy it is to manage your database using the KOS SDK.
Before Starting
Before running the examples on this page, it’s a good idea to have a program that will let you open a SQLite database and view/edit its contents. Our recommendation is "DB Browser for SQLite", although you can use whatever tool you want.
The following examples show screenshots of the databases we’re creating, so you might want to download a viewer before continuing.
|
DB Browser for SQLite
"DB Browser for SQLite (DB4S) is a high quality, visual, open source tool to create, design, and edit database files compatible with SQLite." It’s available on Linux, macOS, and Windows. You can read about and download it from sqlitebrowser.org. |
|
Source code for this and most other Java reference pages is available on GitHub. |
Schema #0 Example
In this example, you will create two classes:
-
DbConstants
-
OurDatabaseMigrator
S0: Database design
This section shows how to create the initial database. The next section shows how to modify the database’s schema as your design progresses.
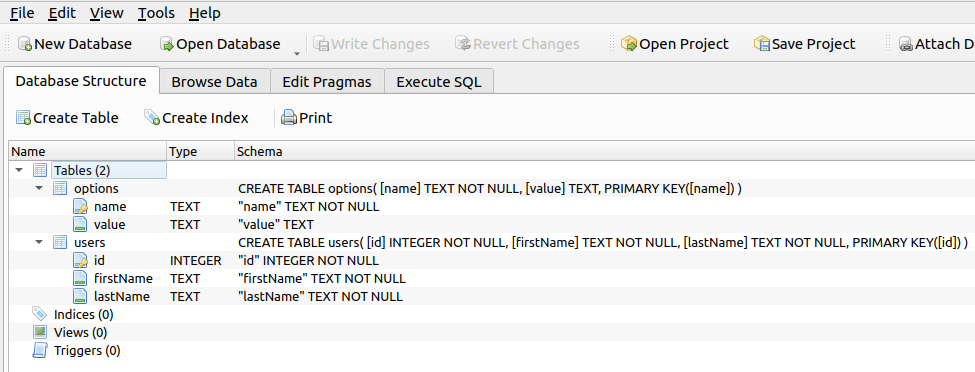
We are going to create one database named "dbname" that contains two simple tables, "users" and "options".
Here’s the basic design:
S0: Main application
To get started, let’s create a "main" application. After copying this code, change line 5 to an existing directory where you would like the database file to exist.
DbConstants classpublic final class DbConstants {
// Set these before you start:
public static final String DB_NAME = "dbname";
public static final String DB_LOCATION = "/home/rob/data/examples/database";
}S0: Database migrator
There is a single class you must write, which implements DatabaseMigrator. It contains all of the SQL statements to create and modify your database’s schema design.
-
OurDatabaseMigrator is a class you create (name it whatever you want)
-
DatabaseMigrator is a KOS SDK component
-
Jdbi is a JDBI object, used to make database calls
|
JDBI
JDBI is a set of classes designed to make working with JDBC (Java database connectivity) easier. "Jdbi provides convenient, idiomatic access to relational data in Java. Jdbi is built on top of JDBC. It improves JDBC’s rough interface, providing a more natural Java database interface that is easy to bind to your domain data types." This is how you should access all of your database objects. You can read more about JDBI at their website. |
OurDatabaseMigrator classpublic class OurDatabaseMigrator implements DatabaseMigrator {
@Override
public int getCurrentSchema() {
return 0; (1)
}
@Override
public void migrateToSchema(DataSource datasource, int schema) {
// Grab a JDBI object:
final Jdbi jdbi = Jdbi.create(datasource);
switch (schema) {
// Initial schema version #0:
case 0 -> jdbi.useHandle(handle -> { (2)
// Create the "users" table:
handle.execute("""
CREATE TABLE users(
[id] INTEGER NOT NULL,
[firstName] TEXT NOT NULL,
[lastName] TEXT NOT NULL,
PRIMARY KEY([id]))""");
// Create the "options" table:
handle.execute("""
CREATE TABLE options(
[name] TEXT NOT NULL,
[value] TEXT,
PRIMARY KEY([name]))""");
});
default -> throw new ConfigException(
String.format("Invalid schema version [%s] encountered", schema));
}
}
}| 1 | The very first schema version is zero. |
| 2 | These are the statements used to create the initial database. |
This is all the code required to ensure that the database gets created.
Notice that the getCurrentSchema() method returns zero, which is our starting version number.
Next, see that the migrateToSchema() method checks for a version number of zero, then makes two handle.execute() calls to create each table using SQL statements.
Any other schema number causes a ConfigException to be thrown.
No other DatabaseMigrator methods need to be overridden.
S0: Running the code
The following demonstrates how to run this code.
MyClass0 classpublic class MyClass0 {
private DataSource dataSource;
public void initDatabase() {
DatabaseFactory databaseFactory = new DatabaseFactory();
OurDatabaseMigratorSchema ourDatabaseMigrator = new OurDatabaseMigratorSchema();
File dir = new File(DbConstants.DB_LOCATION);
// This line creates the SQLite database file:
dataSource = databaseFactory.getDataSource(ourDatabaseMigrator, DbConstants.DB_NAME, dir);
// The dataSource object is now ready for use.
}
}After running this, it should create a dbname_0.sqlite database with the desired tables, in the directory you specified.
Schema #1 Example
As time goes on, you decide to modify your database’s schema. How do we accomplish that?
Using the KOS SDK, this becomes a very simple exercise.
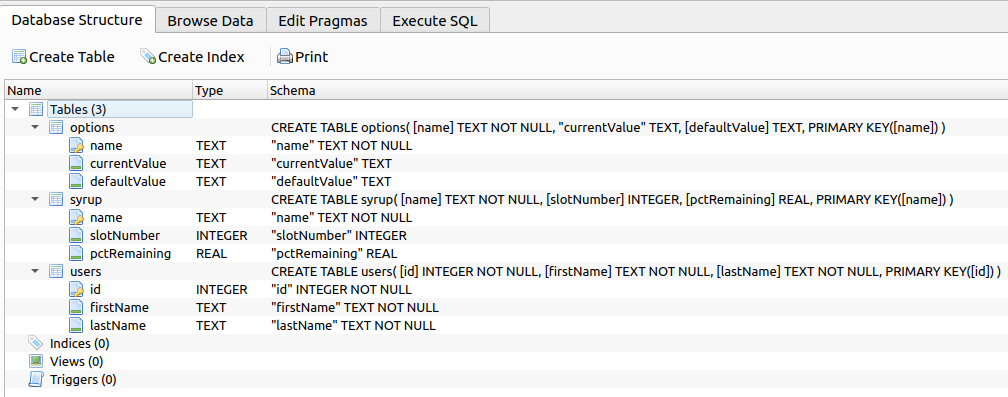
Let’s say we want to make these changes to our sample database:
In the "options" table:
-
rename the "value" field to "currentValue", and
-
add the "defaultValue" field.
Add a new table named "syrup", with the fields "name", "slotNumber", and "pctRemaining"
S1: Database design
When finished, our design is:
database name: "dbname"
schema version: 1 (1)

table: "users"
field 1: "id" (integer, primary key)
field 2: "first_name" (text)
field 3: "last_name" (text)

table: "options"
field 1: "name" (text, primary key)
field 2: "currentValue" (text) (2)
field 3: "defaultValue" (text) (3)

table: "syrup" (4)
field 1: "name" (text, primary key)
field 2: "slotNumber" (integer)
field 2: "pctRemaining" (double)| 1 | Notice that the schema version has been incremented. |
| 2 | This field was renamed. |
| 3 | This field was added. |
| 4 | This is a new table. |
S1: Database migrator
For this to work, all you need to do is modify the OurDatabaseMigrator class, migrateToSchema() method with code that knows how to modify schema 0 to arrive at schema 1. The following shows those code changes.
OurDatabaseMigrator classpublic class OurDatabaseMigrator implements DatabaseMigrator {
@Override
public int getCurrentSchema() {
return 1; (1)
}
@Override
public void migrateToSchema(DataSource datasource, int schema) {
// Grab a JDBI object:
final Jdbi jdbi = Jdbi.create(datasource);
switch (schema) {
// Initial schema version #0:
// (same code as before, left out here for brevity)
// Current schema version #1:
case 1 -> jdbi.useHandle(handle -> { (2)
// In the "options" table, change column name from [value] to [currentValue]:
handle.execute("""
ALTER TABLE options
RENAME COLUMN [value] TO [currentValue]""");
// In the "options" table, add column [defaultValue]:
handle.execute("""
ALTER TABLE options
ADD COLUMN [defaultValue] TEXT""");
// Create the "syrup" table:
handle.execute("""
CREATE TABLE syrup(
[name] TEXT NOT NULL,
[slotNumber] INTEGER,
[pctRemaining] REAL,
PRIMARY KEY([name]))""");
});
default -> throw new ConfigException(
String.format("Invalid schema version [%s] encountered", schema));
}
}
}| 1 | The version changed from zero to one. |
| 2 | These are the required SQL statements to change schema #0 to scheme #1 |
As you can see, the schema 1 case statement issued a couple ALTER TABLE statements and one CREATE TABLE statement. These convert schema version 0 to 1.
When it’s time for schema version 2, you simply create the SQL statements that convert schema version 1 to 2. And likewise, repeat this process for each new version.
If your application at some point needs to upgrade the database from schema 3 to 5, there’s nothing extra you have to do. The internal KOS SDK will first convert from 3 to 4, and then from 4 to 5.
Also, the old database is actually still present in the dbname_0.sqlite file, while the new database is in the dbname_1.sqlite file. This technique allows for database fallback; where the application decides to use an older version of the database.
|
SQLite Documentation
Refer to the SQLite documentation page at SQLite for the exact syntax of database commands. |
On this page
Java Development
Seamlessly transition from Legacy+ systems to Freestyle microdosing and advanced distributed dispense systems.
UI Development
Using KOS SDKs, integrating Consumer and Non-consumer facing UIs becomes seamless, giving you less hassle and more time to create.
Video Library
Meet some of our development team, as they lead you through the tools, features, and tips and tricks of various KOS tools.
Resources
Familiarize yourself with KOS terminology, our reference materials, and explore additional resources that complement your KOS journey.
Copyright © 2024 TCCC. All rights reserved.