    <dependency>
        <groupId>com.kosdev.kos.sdk.api</groupId>
        <artifactId>api-dispense</artifactId> (1)
        <scope>provided</scope>
</dependency>Tutorials
Hardware
Introduction
In this page, we write code associated with the actual hardware in our dispenser:
-
the valves
-
computer board
-
nozzle
-
overall assembly
Write the Code
This sections deals with writing the code to build our dispenser.
POM file
Since we’ll be dispensing drinks, we need to import the KOS dispense API. Make the following change to the pom.xml file. There’s no need to also include api-core, as it is a dependency in api-dispense.
| 1 | Changed from api-core to api-dispense |
Pump class
There are six valves in our demo dispenser, therefore we’ll create a class corresponding to a valve. Because the base class in KOS is named Pump, and since a valve is just special case of a pump, let’s name the class OurPump.
OurPump class (first pass)
package com.example;

import com.tccc.kos.commons.util.concurrent.future.FutureWork;
import com.tccc.kos.core.service.hardware.Board;
import com.tccc.kos.ext.dispense.Pump;
import com.tccc.kos.ext.dispense.PumpConfig;
import lombok.Getter;
import lombok.Setter;

public class OurPump extends Pump<PumpConfig> {

    @Getter @Setter
    private PumpConfig config = new PumpConfig();  // pump's configuration data
    @Getter
    private final int position;  // valve's position on the circuit board
    @Getter @Setter
    private boolean pouring;     // true when this valve is on, false when off

    public OurPump(Board board, int position, String name, String category) {
        super(board, name, category);
        this.position = position;
    }

    @Override
    public String getType() {
        return "ourPumpType";
    }

    /**
     * Timed pour: pour for the specified amount of time (in millisecconds).
     */
    @Override
    public FutureWork tpour(int duration, double rate) {
        return null;
    }

    /**
     * Volume pour: pour the specified volume (in milliliters).
     */
    @Override
    public FutureWork vpour(int volume, double rate) {
        return null;
    }
}
Board class
Next up, we create our custom PumpBoard class, which creates the six OurPump objects.
OurBoard class
package com.example;

import com.tccc.kos.core.service.assembly.Assembly;
import com.tccc.kos.core.service.hardware.Board;
import com.tccc.kos.ext.dispense.PumpBoard;
import java.util.ArrayList;
import java.util.List;
import lombok.Getter;
import lombok.extern.slf4j.Slf4j;

@Slf4j @Getter
public class OurBoard extends PumpBoard {

    private final String instanceId;
    private final OurPump plainWaterPump;
    private final OurPump carbonatedWaterPump;
    private final List<OurPump> syrupPumps;
    private final List<OurPump> allPumps = new ArrayList<>();

    /**
     * Creates our pumps at the given positions:
     * - 1) pw: plain water
     * - 2) cw: carbonated water
     * - 3) s1: syrup #1 (don't care what the ingredients are at this time)
     * - 4) s2: syrup #2
     * - 5) s3: syrup #3
     * - 6) s4: syrup #4
     */
    public OurBoard(Assembly assembly, String name, String instanceId) {
        super(assembly, name);
        this.instanceId = instanceId;

        // Create the plain water pump (P1):
        int position = 1;
        plainWaterPump = new OurPump(this, position, "P" + position, "water"); (1)

        // Create the carbonated water pump (P2):
        position++;
        carbonatedWaterPump = new OurPump(this, position, "P" + position, "water"); (2)

        // Create the syrup pumps (P3 - P6):
        syrupPumps = new ArrayList<>();
        for (int i = 1; i <= 4; i++) {
            position++;
            syrupPumps.add(new OurPump(this, position, "P" + position, null)); (3)
        }

        // Create list of all pumps:
        allPumps.add(plainWaterPump);
        allPumps.add(carbonatedWaterPump);
        allPumps.addAll(syrupPumps);
    }

    @Override
    public String getType() {
        return "ourBoardType";
    }
}| 1 | The first pump, in position #1, is plain water, named "P1" |
| 2 | The second pump, in position #2, is carbonated water, named "P2" |
| 3 | The four syrup pumps, in positions #3 - #6, are named "P3", "P4", "P5", and "P6" |
Assembly class
Now that OurBoard class is written, we turn our attention to our custom CoreAssembly class. It contains our board, a Nozzle, and dix Holder objects, one for each pump.
OurAssembly class
package com.example;

import com.tccc.kos.core.service.assembly.CoreAssembly;
import com.tccc.kos.ext.dispense.Holder;
import com.tccc.kos.ext.dispense.service.nozzle.Nozzle;
import lombok.Getter;
import lombok.extern.slf4j.Slf4j;

@Slf4j
public class OurAssembly extends CoreAssembly {

    @Getter
    private OurBoard ourBoard;

    public OurAssembly() {
        buildAssembly();
    }

    private void buildAssembly() {

        // Create the circuit board and add it to the assembly:
        ourBoard = new OurBoard(this, "board1", "1"); (1)
        add(ourBoard);

        // Create the nozzle and add it to the assembly:
        Nozzle<OurIngredient> nozzle1 = new Nozzle<>(this, "nozzle1"); (2)
        add(nozzle1);

        // Add all of the pumps from the board to the nozzle:
        nozzle1.add(ourBoard.getAllPumps()); (3)

        // Create the water holders PW and CW:
        add(new Holder(this, "PW", ourBoard.getPlainWaterPump())); (4)
        add(new Holder(this, "CW", ourBoard.getCarbonatedWaterPump()));

        // Create the syrup holders S1 - S4:
        int i = 0;
        for (OurPump pump : ourBoard.getSyrupPumps()) {
            i++;
            String holderName = "S" + i;
            add(new Holder(this, holderName, pump)); (5)
        }
    }

    @Override
    public void install() {
        log.info("Installing OurAssembly..");
    }

    @Override
    public void uninstall() {
        log.info("Uninstalling OurAssembly..");
    }
}| 1 | Instantiate our custom board |
| 2 | Instantiate a nozzle |
| 3 | Add all six pumps to the nozzle |
| 4 | Create a holder for each type of water |
| 5 | Create a holder for each of the pumps |
|
Common abbreviations
The following abbreviations are used to identify ingredient lines and pumps.
Numbers are used to indentify each ingredient when multiple are available. For example, "S1", "S2", "A1", "F4", etc. |
What we have
At this point, our Assembly has one circuit PumpBoard, six Holder objects, and a Nozzle. The board contains each of the pumps, each holder is associated with a pump, and the Nozzle knows about each pump.
Assembly
    PumpBoard
    |   Pump1 (plain water)
    |   Pump2 (carbonated water)
    |   Pump3 (Coke)
    |   Pump4 (Diet Coke)
    |   Pump5 (Orange)
    |   Pump6 (Grape)
    Holder1 (associated with Pump1)
    Holder2 (associated with Pump2)
    Holder3 (associated with Pump3)
    Holder4 (associated with Pump4)
    Holder5 (associated with Pump5)
    Holder6 (associated with Pump6)
Nozzle (holds references to each pump.|
Note
It may seem odd that there appears to be an extra set of objects, the Holder classes. While there is a one-to-one relationship between a Valve (Pump) and a Holder in our simple dispenser, there are cases where this does not hold true. Future tutorials discuss those situations. |
Add to MyApp
Now that we have our three new classes, we need to instantiate and install our assembly into our application. Modify MyApp to include the new lines shown below.
@Slf4j
public class MyKosApp extends SystemApplication<BaseAppConfig> {

    @Getter
    private OurAssembly assembly; (1)

    @Override
    public void load() {
        log.info("MyKosApp.load()");
        getCtx().add(new MyController());
    }

    @Override
    public void start() {
        log.info("MyKosApp.start()");
        assembly = new OurAssembly(); (2)
        installAssembly(assembly); (3)
        log.info("Assembly installed.");
    }
}| 1 | Add property for OurAssembly object |
| 2 | Instantiate our assembly |
| 3 | Install the assembly |
Make sure the Java code successfully compiles.
Test It Out
Set a breakpoint at the installAssembly() call in MyKosApp. Debug the application. Examine the value of the ourBoard property.
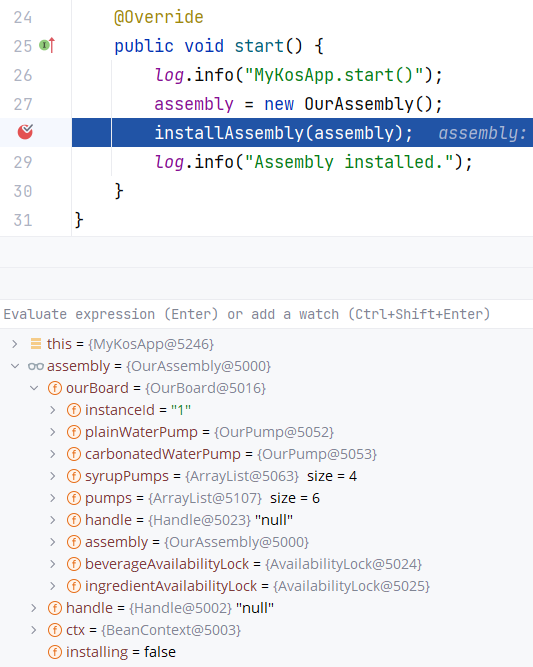
Figure 2. Hitting a breakpoint in your KOS application
Notice that there’s a plain water pump, a carbonated water pump, four syrup pumps, for a total of six pumps all together. Notice that the board also refers back to its containing assembly.
View handles
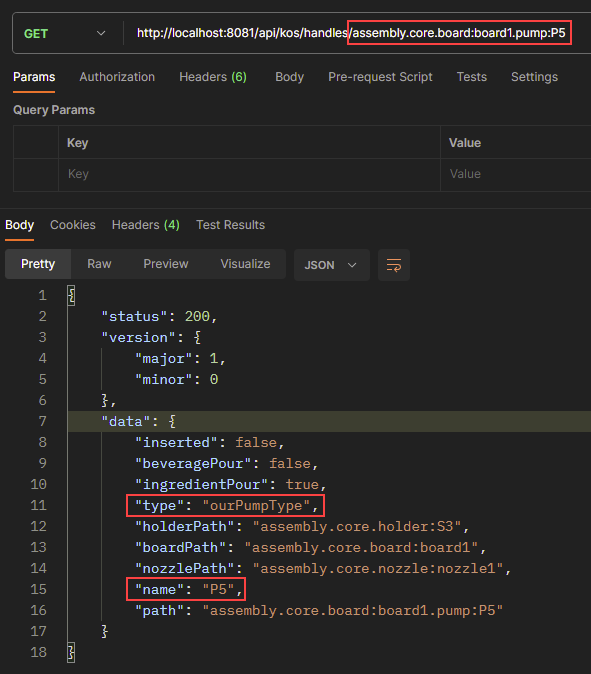
Since we’ve added a number of new software components, let’s look at our list of handles by issuing the following HTTP URL:
http://localhost:8081/api/kos/handlesYou now see that our six pumps and six holder, in addition to our board and the nozzle, appear in the list:
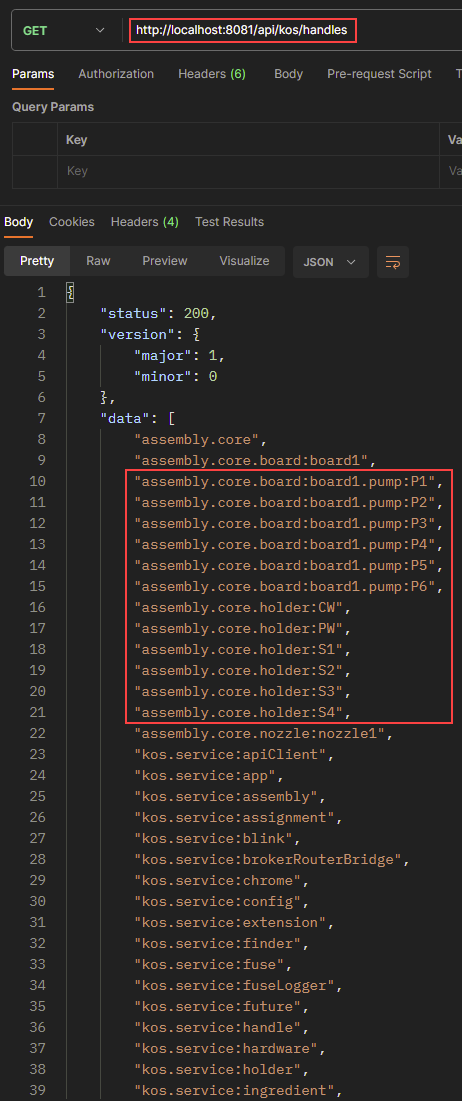
Figure 3. Viewing all handles
Summary
In this tutorial we created software components for each of our hardware pieces: an assembly, a board, six pumps, and a nozzle.
In the next tutorial, we’ll figure out how to associate ingredients in our dispenser.
On this page
Java Development
Seamlessly transition from Legacy+ systems to Freestyle microdosing and advanced distributed dispense systems.
UI Development
Using KOS SDKs, integrating Consumer and Non-consumer facing UIs becomes seamless, giving you less hassle and more time to create.
Video Library
Meet some of our development team, as they lead you through the tools, features, and tips and tricks of various KOS tools.
Resources
Familiarize yourself with KOS terminology, our reference materials, and explore additional resources that complement your KOS journey.
Copyright © 2024 TCCC. All rights reserved.