Tutorials
Pour Engine & Graph
Introduction
We now have an assembly, a board, six pumps, and our ingredients all in place. The next step is to create a pour engine and beverage graph, which we explain in this tutorial.
Define beverages
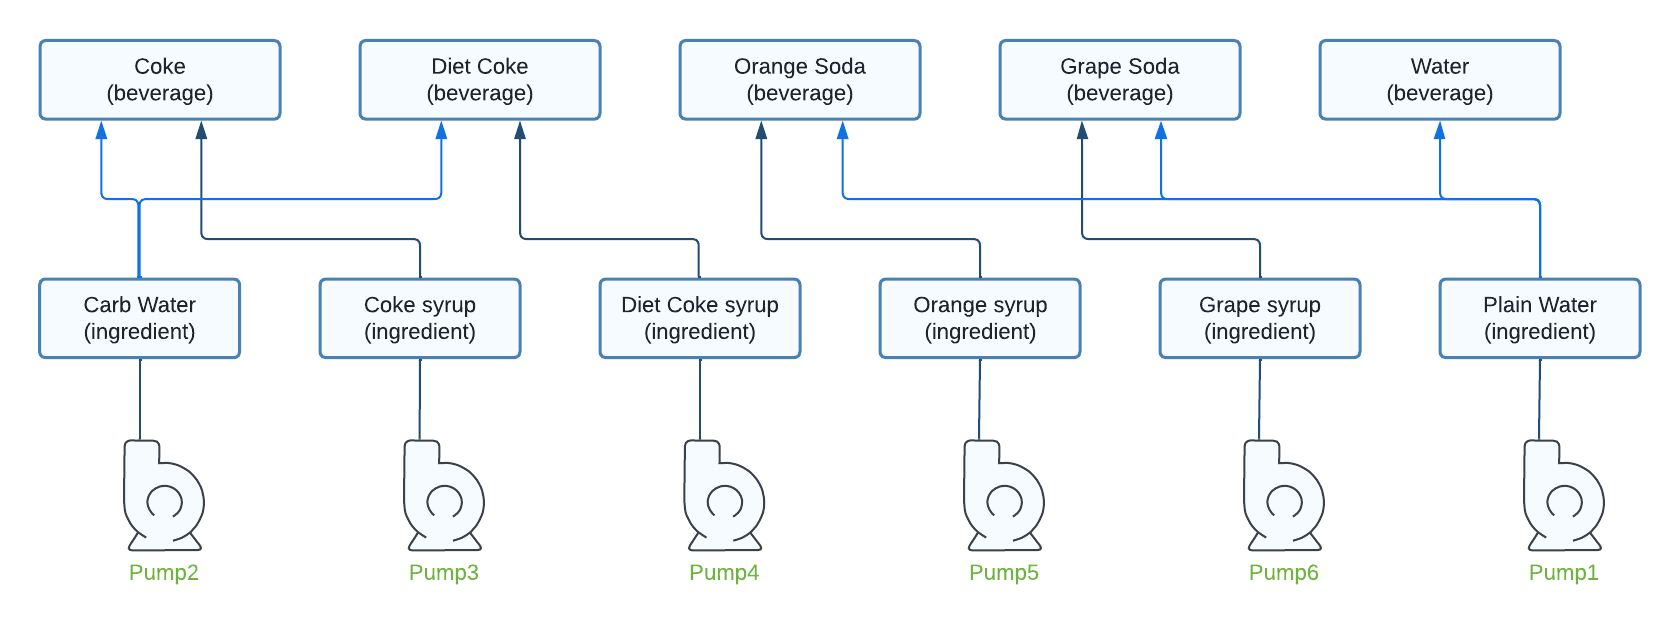
Now that we have ingredients, let’s consider how we combine those to make beverages. A beverage is a drink delivered to the end-user that is a combination of one or more ingredients. Visually, it looks like this:
Figure 1. Beverage definitions
As you can see, we have five possible beverages from our six ingredients. For example, the Coke beverage is a combination of Coke syrup and carbonated water. Orange soda is a combination of orange syrup and plain water. Note that water itself is also a beverage.
This diagram illustrates what is known as the "beverage graph", with each item representing a "node". Later in this tutorial we’ll build the software representation of this graph.
Java
Before we do anything with our beverage graph, we need to build some code up around it.
1) Create the pour engine
To pour from a nozzle we must add a NozzlePipeline. Since we want to pour beverages, we’re going to use BeverageNozzlePipeline (as oppossed to the IngredientNozzlePipeline). This class requires a custom BeveragePourEngine implementation, so let’s start with a minimal pour engine. We’ll come back later and add some functionality.
Creation of OurPourEngine
package com.example;

import com.tccc.kos.commons.util.concurrent.future.FutureWork;
import com.tccc.kos.ext.dispense.pipeline.beverage.BeveragePourEngine;
import com.tccc.kos.ext.dispense.pipeline.beverage.pour.BeveragePourEngineConfig;
import com.tccc.kos.ext.dispense.pipeline.beverage.Pourable;
import com.tccc.kos.ext.dispense.pipeline.beverage.graph.BevGraphBuilder;

public class OurPourEngine extends BeveragePourEngine<BeveragePourEngineConfig> {

    @Override
    public void start() {
    }

    @Override
    public void stop() {
    }

    @Override
    public Pourable getPourable(String definitionStr) throws Exception {
        return null;
    }

    @Override
    public boolean isPourable(Pourable pourable) throws Exception {
        return false;
    }

    @Override
    protected FutureWork buildFuture(Pourable pourable) {
        return null;
    }

    @Override
    public void rebuildGraph(BevGraphBuilder builder) {
    }
}
2) Instantiate a pipeline
Next, we create a BeverageNozzlePipeline and add it to the nozzle in the Assembly.
Modification to the
buildAssembly() method in OurAssembly class private void buildAssembly() {
// Create the circuit board and add it to the assembly:
ourBoard = new OurBoard(this, "board1", "1");
add(ourBoard);
// Create the nozzle and add it to the assembly:
Nozzle nozzle1 = new Nozzle(this, "nozzle1");
add(nozzle1);
// Add the pour pipeline to the nozzle:
OurPourEngine pourEngine = new OurPourEngine(); (1)
BeverageNozzlePipeline pourPipeline = new BeverageNozzlePipeline(pourEngine); (2)
nozzle1.add(pourPipeline); (3)
// . . .
}| 1 | Instantiate our custom pour engine |
| 2 | Create a pour nozzle pipeline |
| 3 | Add this pipeline to our nozzle |
3) Build the beverage graph
In this section, please refer to Figure 1 above.
To build a beverage graph, let’s look at the rebuildGraph() method in OurPourEngine.
KOS calls this method when a change occurs that might impact the contents of the graph. For example, when a new ingredient is assigned, or when a new set of ingredients are installed.
a) Build nodes for the pumps
First off, at the "bottom" of the beverage graph exists our pumps. We need a node for each pump. As it turns out, we can skip this as BevGraphBuilder does this automatically.
b) Build nodes for the ingredients
Next, in the "middle" of the beverage graph (on top of our pumps) are our ingredients. We need a node for each ingredient. This is accomplished with a single call to the BevGraphBuilder.
Code that builds graph nodes for our ingredients
public class OurPourEngine extends BeveragePourEngine<BeveragePourEngineConfig> {

    @Override
    public void rebuildGraph(BevGraphBuilder builder) {

        // Add ingredient nodes for every pump:
        builder.addIngredientNodes(); (1)
    }
}| 1 | Add ingredient nodes into the beverage graph |
c) Build nodes for the beverages
At the "top" of the graph sits all of our beverages. As with pumps and ingredients, we also need a node for each beverage. This is a bit more complex because we must know how ingredients are combined to make a beverage. Here’s the code to handle this.
Code that builds our full graph, including ingredients and beverages
public class OurPourEngine extends BeveragePourEngine<BeveragePourEngineConfig> {

        // Add ingredient nodes for every pump:
        builder.addIngredientNodes(); (1)

        // Process each ingredient available in the builder:
        for (String ingredientId : builder.getIngredientIds()) { (2)

            // Look up the ingredient:
            OurIngredient ingredient = (OurIngredient)getIngredient(ingredientId); (3)
            if (ingredient == null) {
                continue;
            }

            // We don't have a beverage that consists only of carbonated water:
            if (ingredient.getId().equals(OurIngredient.ID.CARB_WATER)) { (4)
                continue;
            }

            // Build a beverage for this ingredient. In BiB-based systems, a beverage
            // is just a combination of an ingredient with plain or carbonated water.
            // This allows us to create a synthetic beverage ID for each ingredient,
            // which represents the combination of the syrup and a water to form a beverage.
            String beverageId = "bev:" + ingredientId; (5)

            // Build a beverage for the ingredient using the synthetic beverage ID, but
            // store the ingredient ID in the alt ID field so that we can access it later.
            builder.addBeverage(new BeverageNode(beverageId, ingredientId)); (6)

            // The new beverage node depends on the associated BiB ingredient, so link them:
            builder.addDependency(beverageId, ingredientId); (7)

            // If the ingredient is a syrup then it needs to be poured with water or carb,
            // so add a dependency for the associated water ingredient:
            if (ingredient.getType() == OurIngredient.Type.syrup) {
                String childId = ingredient.isCarbonated() ? OurIngredient.ID.CARB_WATER : OurIngredient.ID.PLAIN_WATER;
                builder.addDependency(beverageId, childId); (8)
            }
        }
    }
}| 1 | Create ingredient nodes that sit on top of each pump; at this point, the bottom and middle sections of the graph are in place |
| 2 | Loop through all of our ingredients |
| 3 | Given an ID, lookup the ingredient |
| 4 | If the ingredient is carbonated water, then skip it, as we are not creating a carb water only beverage |
| 5 | Create the "synthetic" beverage ID |
| 6 | Create a BeverageNode with this beverageId and add it to the builder |
| 7 | A dependency node of this beverage is the ingredient itself (for example, Coke syrup is required to pour a Coke beverage) |
| 8 | Mix the syrup with either plain or carbonated water |
Insert ingredients
The last thing we need to do is actually "insert" the ingredients into the holders.
a) Create custom container class
We create a Container class to make our insertion code simpler.
package com.example;

import com.tccc.kos.ext.dispense.Container;
import com.tccc.kos.ext.dispense.ContainerSlice;

/**
 * Simple container that contains a single slice.
 * Both the Container and its ContainerSlice use ingredientId as their IDs.
 */
public class OurContainer extends Container {

    /**
     * Creates a new container with the specified ingredient ID.
     */
    public OurContainer(String ingredientId) {
        super(ingredientId, new ContainerSlice(ingredientId));
    }
}
b) Insert ingredients into holders
We modify our assembly class by overridding the postInstall() method. We use the InsertionService to insert the instrinsic ingredients (water and carb) as well as the standard ingredients (syrups).
@Slf4j
public class OurAssembly extends CoreAssembly {
    // . . .

    @Override
    public void postInstall() {
        // Insert plain and carbonated water as intrinsic ingredients:
        insertionService.insertIntrinsic(OurIngredient.ID.PLAIN_WATER, ourBoard.getPlainWaterPump().getHolder());
        insertionService.insertIntrinsic(OurIngredient.ID.CARB_WATER, ourBoard.getCarbonatedWaterPump().getHolder());

        // We are hard-coding this list of ingredients to make this example
        // easier to understand, as we know that the syrup pumps are in this order:
        List<String> ingredientIds = List.of(
                OurIngredient.ID.COCA_COLA, OurIngredient.ID.DIET_COKE,
                OurIngredient.ID.ORANGE_SODA, OurIngredient.ID.GRAPE_SODA);

        // Insert the syrup ingredients:
        List<OurPump> syrupPumps = ourBoard.getSyrupPumps();
        for (int i = 0; i < syrupPumps.size(); i++) {
            OurContainer ourContainer = new OurContainer(ingredientIds.get(i));
            String holderPath = syrupPumps.get(i).getHolder().getPath();
            insertionService.insert(false, ourContainer, holderPath);
        }
    }
}
Try It Out
The main endpoint to try is the "availability" endpoint. It returns the availability (can it be poured or not?) of all registered beverages, brands, and groups. We’re not using brands or groups at the moment, but you can read about them in BevGraphBuilder.
|
Brands and Groups
In our graph, we could build nodes for brands and/or groups on top of beverages. An example of a brand is "Coca-Cola", which would consist of both Coke and Diet Coke beverages. An example of a group is "diet drinks", which would consist of Diet Coke and water. Of course, in a full system, there could be any number of brands, any number of groups, and any number of beverages in each. Future tutorials will dig into these topics. |
List of beverages
The availability endpoint is relative to the nozzle (which we named nozzle1), as it’s installed as a pipeline. Therefore, the endpoint is:
http://localhost:8081/api/nozzle/nozzle1/pipeline/beverage/availabilityWhich gives us the following data. Note that all five of our beverages are visible and available.
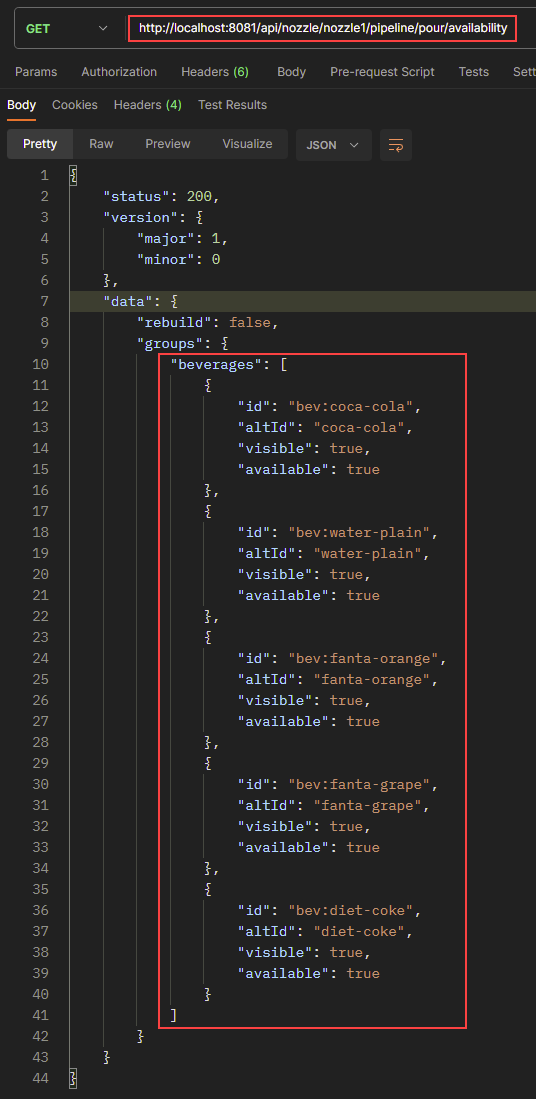
Figure 2. Beverages that can be poured (AKA pour availability)
|
Availability
Built-in to KOS is the ability to automatically determine drink availability. For example, using our demo dispenser:
Future tutorials demonstrate this. |
Beverage node
You can also view any beverage node by using its ID:
http://localhost:8081/api/nozzle/nozzle1/pipeline/beverage/graph/node/bev:coca-colaYou’ll see the following, which shows that the Coca-Cola beverage requires both the Coca-Cola ingredient and carbonated water:
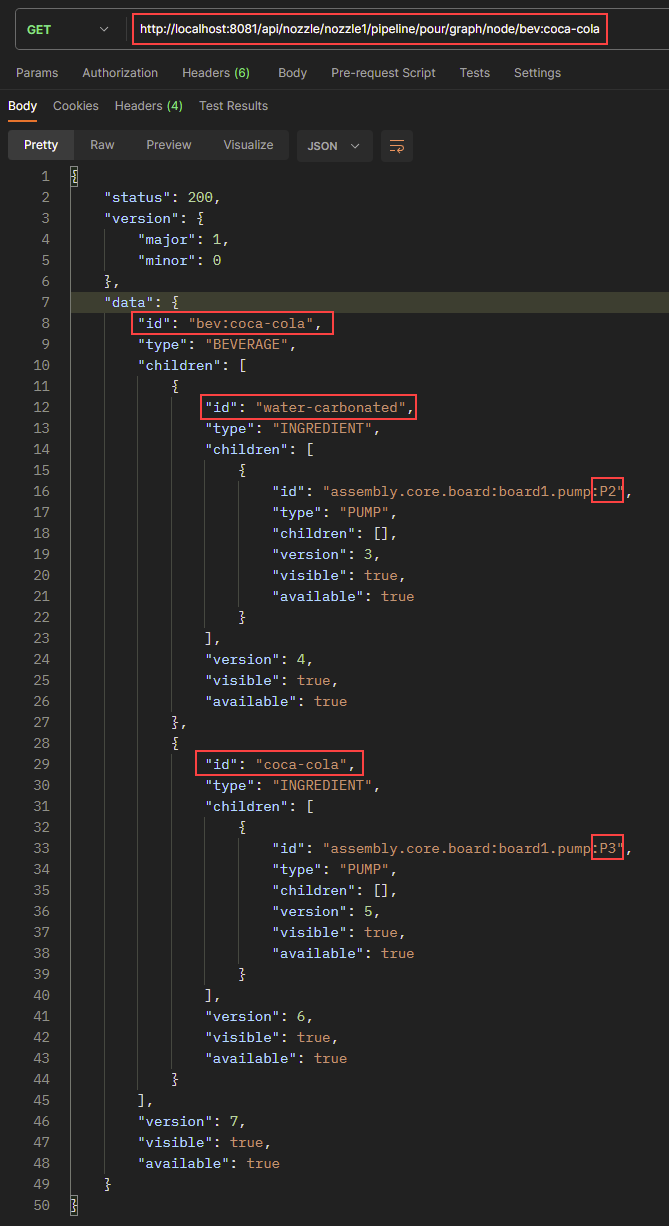
Figure 3. The Coca-Cola beverage node
On this page
Java Development
Seamlessly transition from Legacy+ systems to Freestyle microdosing and advanced distributed dispense systems.
UI Development
Using KOS SDKs, integrating Consumer and Non-consumer facing UIs becomes seamless, giving you less hassle and more time to create.
Video Library
Meet some of our development team, as they lead you through the tools, features, and tips and tricks of various KOS tools.
Resources
Familiarize yourself with KOS terminology, our reference materials, and explore additional resources that complement your KOS journey.
Copyright © 2024 TCCC. All rights reserved.